Being (mostly) an account of the creative endeavors of an artist and collector whose wings have been clipped by hypersensitivity to the chemicals in our everyday environment.
Monday, October 3, 2016
Gwennie-Inspired Medallion Reveal
You may recall that I made liberated log cabin blocks in the first round when we were to be inspired by any aspect of childhood. (You can read about that here if you missed it.) That meant I had a real challenge when the next prompt came and it turned out to be log cabins. Rather than making more blocks I treated the whole medallion as a giant log cabin and only added some framing strips, Courthouse Steps style.
The next design prompt was stars. Seemed easy enough but I got stuck at that point. I had a few ideas, but without knowing what the final prompt would be I was afraid to make a move. That turned out to be a difficult month for me physically too. I fussy cut more images from one of the prints in my palette and randomly made a couple of stars but didn't build a single border.
The final prompt was completely unexpected: add something fishy. Given the nature of my medallion thus far I was driven to find some fish skeletons. And I did! In the right colors and scale to boot! But how to incorporate them in a way that made sense? How would fish skeletons come into the picture? Because cats had eaten the fish of course!
Cats are also fond of mice. The lower half of the quilt became a garden in my mind, the source of the roses in the baskets that started this whole adventure.
Along with the ubiquitous spiders of course. ;- )
I kept the creatures of the air in the upper half of the borders, with the exception of a few skeletons dancing in the star light.
And now, the whole quilt top:
I do have one more design decision to make. I'm debating whether to add final border strips, partly to bring the quilt closer to the size I was shooting for (although it's perfectly acceptable the way it is) and partly to frame the composition.
On the other hand, I don't want it to look like it's waiting for another border. These whole-cloth strips will mimic the strips in the Courthouse Steps round and I wonder if that will be redundant. I'm planning to bind the whole thing - eventually - in black. This shot isn't much to go on but I don't have much room to audition any further either. I'll only be adding 4" overall to the width and somewhere between 2" to 4" to the height if I go with the black border strips. I'll take all suggestions into consideration, thank you very much.
Now, if you haven't already, I highly recommend you to pop over to the link party on Lori's blog so you can see the whole gamut of liberated medallion quilts that have been created during this quilt along! This has been a really fun trip and I'm grateful to all the hostesses for making it so. :- )
Friday, July 1, 2016
Macabre Medallion
Just to refresh your memory, these are the baskets I made to begin my medallion:
My first step was to choose what to put in my log cabin blocks and what to use for the logs. My sister and I were both given piano lessons during our early years. She enjoyed it much more than I did. She's a natural musician.
The hands and the strip of music print above felt very appropriate. I've turned out to be more of a visual artist. ;- )
I also found this "portrait" to use to represent my sister and I. To create a gallery wall I framed the portrait with a postage stamp print. The calico above and below the portraits is something my mother bought for me a long time ago when I was still a fairly new quilt maker. It's been waiting all this time to be put to good use. This isn't quite what I had in mind when I originally chose the print but it turned out to be perfect for this project!
I had to have birds in my quilt. It's become sort of a thing for me. There were some great ravens/crows in the same print I took the sisters out of.
These dancing skeletons are another of my cherished prints. There wasn't much left so I decided to use it up in this quilt. Some of them appear to be playing leap frog. I've also used text prints that feature phrases from classic children's stories.
There's some French text as well since I studied French all throughout my high school years.
Here's the progression of the medallion on my design wall:
And this is where I stopped:
At this point it measures about 33" high and 53" wide. I could have added framing strips to bring it up to nice even numbers but decided to wait to see what the next step will be. And that day has finally arrived! Cathy at Big Lake Quilter will be giving us the next prompt. You can see all the other basket medallion projects via the link-up over on Cynthia's blog.
Tuesday, May 1, 2012
Strips & Snails & Puppy Dog Tails
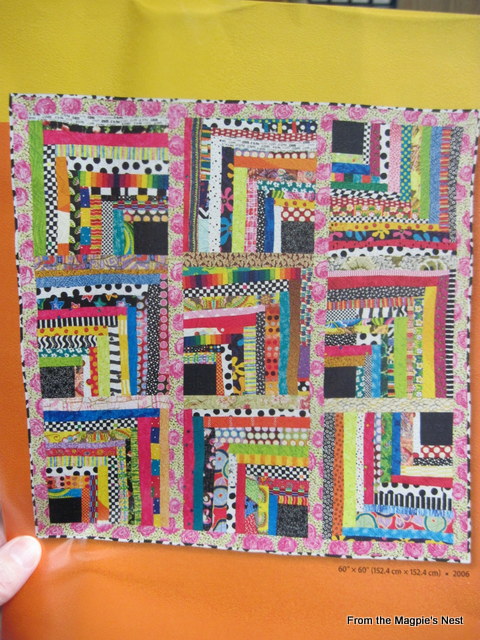
Actually, I had a few days where I was unable to function. Then, in desperation, I paged through my Gwen & Freddy books for color and inspiration. This "Housetop" quilt caught my attention.
I needed something I could do without too much thought or effort. This looked do-able and these 4.5" patches seemed like a good place to start.
Making a quilt of chevron or half log cabin or housetop blocks has been on my list of Quilts To Make for years. I gave myself permission to let this be the first one, and to let it be as scrappy as it needed to be. In two days I had seven blocks built up and trimmed down to 18.5," which is the size Gwen & Freddy used for their version.
Seven blocks was either one too many for a baby quilt or not enough for a larger person's quilt. Before I had made up my mind what to do my friend C~ talked with me about the need for quilts for the young men in the Foster Care system. Our local quilt group makes plenty of baby and child size quilts but the teenagers tend to get left out, especially the young men. So I decided to make five more blocks, and to try to skew the blocks masculine and older. This was not easy to do! I don't have a lot of florals in my stash but I do have a preponderance of feminine and juvenile prints - at least in my opinion. Eventually I had twelve 18.5" blocks though.
The second set of blocks were started with five inch patches, not 4.5," just because. I also tried hard to make them very dark. The upright sashes between blocks were cut from assorted 2.5" strips but all the horizontal sashing was cut from one print.
It took some doing to find an appropriate print for the outer border. I had just the right thing in my stash though. The gold in the horizontal sashing is reflected in some of the circles on the purple print. Woohoo!
So we have strips... and snails...
and puppy dog tails...
for a young man who, as we all know, will be a little boy at heart forever. ;- )
Tuesday, June 21, 2011
Rules vs. Choices
I have been wielding a needle of one type or another for at least 45 years. I learned to embroider first, as a pre-teen, and the cult of Perfectionism was deeply ingrained by the experiences of my youth.
When I came to quilt making I had two toddlers and another baby on the way. I learned “the rules” from books and magazines and tried diligently to obey them. Of course I started out with less than ideal tools and materials. I quickly discovered that until I could have a rotary cutter and mat there would be few quilts made ‘by the book.’ It took too long to make templates and scissor cut everything.

Even as my tools and skills improved I had no real desire to duplicate the quilts I saw in books or magazines. Nor was I interested in complex or intricate blocks. Then along came Gwen and her first book on liberated quilt making. Freedom! Enlightenment! And encouragement of a kind rarely found in the other books of the era.
For me, quilt making is the art form that I’m the most comfortable with, the easiest in which to express my creative urges. It’s not about making the most quilts or the “best” quilts or exhibiting my work or selling my work (although I would not be opposed to generating a little income!). I want my quilts to be authentic expressions of ME and MY life, not whatever the current trend in the quilt world happens to be at the moment. I also want them to hold up over time, so there are elements of the construction process that I’m picky about.
I guess I have high standards when it comes to the construction process. I like consistent seams that are straight if they’re meant to be straight and wavy if they’re meant to be wavy. I press my seams because I like the way they look and behave when that’s done. I like having a design wall as much for the ease and comfort it provides my body as for the perspective it affords. I happen to prefer a rotary cutter to scissors because I like the feeling of being in control that I get with the cutter. My scissors tend to go where I don’t want them to! Of course, sometimes the cutter does too. ;- ) I rip fabric whenever I can. Have you tried that? It’s a rush for those of us who tend to get caught up in Perfectionism.
The beauty of quilt making is that there’s room for everyone. Look at all the choices we have before us: fabric types, print types, the vast range of colors available, the multitude of processes we can bring to the work, and ultimately how we choose to apply those processes in the work we do. I no longer believe in a right way or a wrong way to do things. (However, in some specific cases there are dangerous ways to do things and it would be wrong to encourage someone to ignore those rules.) I believe in learning as much as you can about what’s available, trying out the things that appeal, and then choosing what will work best for the project you currently have in mind.
Rules or not, the question we need to ask ourselves is the one posed by Ben & Jerry:
Tuesday, January 26, 2010
Triangle Tuesday
I have this pretty coiled fabric bowl made by my friend Heather. I've been using it as a place to collect the squares and rectangles I make out of the scrap triangles that I've been sewing together as leaders and enders. The bowl was getting to the point of overflowing so I thought I'd better do something about it.
I dumped out the bowl, sorted the bits by size and shape, and started sewing things together. This is what I ended up with:
None of these blocks/units are very big. For example, the brown and ecru Broken Dishes blocks in the middle of the design wall would finish at 2.5." The largest Broken Dishes block (in the top row) will finish at 4.5."
Now my bowl looks like this:
I may play with the stuff on the design wall a bit more today, or I may dive into this and make some more things to play with!
Yes, my book is finally ready for me to read and enjoy. (Actually, it was ready late Sunday and I've already read through it once.) Since I'm sort of between major projects at the moment I'm thinking of dedicating the next couple of days to experimenting with some of the liberated blocks I've never tried before. I own and have read every single Liberated Quiltmaking book Gwen has been involved in but I never really understood what she was saying about making those corner units for the Shoo Fly block. This time I finally got it. Duh! So of course now I'm excited about actually trying my hand at it to see if I really do understand. I know it's not rocket science; sometimes we just get blocked by the simplest things - no pun intended!
Wednesday, May 27, 2009
Happy, Happy Day!
I've made some progress with the friendship blocks. I was frankly freaking out about this project early in the day yesterday. I think part of the problem was that I didn't have a clear plan of attack. After working with the bits and pieces for a while I began to understand how it needed to be assembled. By the end of the day I was able to actually get some of the blocks and checkerboard units sewn together and now I feel much better about it. I'm pretty happy with the way it's looking so far.
I still have quite a bit of work to do but it may be hard to maintain momentum because of this:
My altered version of Gwen & Freddy's new book arrived late yesterday! Woohoo! I've already skimmed through it and am anxious to dig deeper. My sweet SIL did this for me, technically for my birthday in June. Hope she'll forgive me for opening my present early ;- )