Wednesday, November 28, 2012

Sunshine Flimsy

Work has continued on the quilt I'm making for a victim of Hurricane Sandy. As I stitched on the long sashing strips it occurred to me that I would have to figure out how to deal with the corners where the Hourglass blocks in the final border would come together. You may remember that this was what it looked like as I was auditioning design choices:


I finally decided to make four Diamond in a Square blocks for the corners:


You may be able to see in the picture below (double click on it to make it bigger) that I had two different blue prints coming together in this corner. It took a little bit of time to decide how to handle that!


Here's a full-on picture, as much as I could get anyway.


The quilt should finish at 65" x 85." I found this print on sale at Delta Patchwork; it's perfect for the back and binding!


I'm thinking of calling this Sunshine & Blue Skies. As it turns out I will be able to send this quilt almost directly to a couple whose home was one of those burned to the ground in Breezy Point, NY courtesy of connections my sister has through her job. And then I'll probably begin another top for someone else who needs a quilty hug. :- )

Thursday, November 22, 2012

Thankful for Progress

Happy Thanksgiving Day to my readers in the USA. :- ) I hope you all have a holiday season that warms your heart.

Among all the other things for which I am grateful this Thanksgiving Day is the fact that I believe I have a plan for turning the collection of old yellow and blue Shoo Fly blocks into a quilt for someone affected by Hurricane Sandy. While this may not seem like an epic struggle to you, my attitude is, "finally!"

After my last post I dug around in my stash for potential sashing fabrics. There were some that would have been good choices but of course I didn't have a big enough piece. These two could have worked:


I also tried out a blue and yellow check:


I like to let things sit for a bit before making a firm decision but eventually the check won out. I put it all the way around my central square and started auditioning blocks and possibilities for the next round.


Originally this was going to be a square, full size quilt top. The more I worked with it however, the more difficult it seemed to get. Eventually I decided to try for a rectangular format for a twin size quilt. Pretty quickly that led to taking the check print off of two sides of the central square. Once I'd done that I found I still needed something to divide the central panel from the next row. (I don't have enough of the blue and yellow check to use it more than once around the top.) I made some 2.5" Hourglass units to see whether I liked that look:


Nope. I tried various prints again too. One was a bright medium blue with tiny little white circles in it, sort of like bubbles. It was too strong for a middle sash but I quite liked it closer to what will be the outer edge. That led to this arrangement:


I'm pretty sure this is the way the top will go together now. The second band of the check print at the top is a piece that came off one side of the center square. I will sash the 7.5" Shoo Fly blocks with narrow yellow strips, add the strip of blue and yellow check, then put the strong blue down the sides and finish the whole thing off with an outer border of 5" Hourglass blocks. That should turn this into what Luana Rubin (eQuilter.com) refers to as a small twin size quilt, 65 x 85 inches. Once I come up with backing, batting, and a volunteer quilter I can then turn my attention to a project that, hopefully, will be less challenging than this one has been! Although, to be fair, probably the only reason this top has seemed so challenging to me is because I'd like to get it done as fast as possible. I've always been, and always will be, an impatient soul. ;- )

Friday, November 16, 2012

Step By Step...

I have sewn the next ring of Shoo Fly blocks around the central panel:


I'm purposely using as many values of yellows as I can because of the variety of values in the collection of blocks that started this project. In the corners where the flying geese border comes together I ended up with three light patches and one medium value patch. Those light patches really stood out, and not in a good way. I think I knew I would have to replace them but I avoided the task as long as I could.


In the end it was worth the effort even though it was a bit tedious to do.


At this point the top would finish at about 50 inches square but I'm shooting for a quilt that will fit on a double bed. The question is, what to do next?

More flying geese?

               Simple sashing?

                               Frame up the remaining 7.5" Shoo Fly blocks to make them ten inches each?

In the end I decided to make a bunch of five inch Hourglass blocks, thinking they would make a good transition from one round of Shoo Fly blocks to another.


Not so much. It's too busy. The blue triangles in the Hourglass blocks overwhelm the Shoo Fly blocks.

What happens if I turn every other block?


Not much better. Guess I need to reconsider my options...

Meanwhile, I can't believe we're halfway through November already. And Thanksgiving - for us Yanks - is next Thursday! Does that seem early to anyone else? ;- )

Monday, November 12, 2012

Growing a Quilt Top

Toward the end of my last post I made a comment to the effect that I wanted to visually separate the four blocks in what will be the center of this quilt. At the time I had four blocks that, in the photograph, appeared to have the same or very similar backgrounds. (Scroll down to the bottom of my last post and you'll see what I mean.) Taking my own comment to heart I changed out two of the blocks to create even more distinction between the Shoo Fly blocks.


Then it became a question of what to do with the rest of the blocks in this particular collection... A solid ring of Shoo Fly blocks perhaps? But then I'd lose the pattern of the individual blocks again...


Maybe grouping darker ones in the corners?


I found myself making the math harder than it needed to be in my attempt to distribute the blocks around the central bit. Turns out a simple one inch sash between the blocks was all that was required.


I did keep the darker background blocks in the corners and worked toward lighter blocks in the middle of each side. Since this picture was taken I've assembled these blocks into a top about 50 inches square. I'll show you that the next time, and maybe by then I'll know what my next step with this project will be!

Monday, November 5, 2012

Quilt Drive

I washed and pressed my lovely new fabrics (see previous post) and then put them right on the shelf when I learned that Luana Rubin was committed to organizing the collection and distribution of quilts for those in the east who have lost everything to Hurricane Sandy.


You can click here to read all about it. The upshot is that I'd already been thinking about making a quilt to donate but hadn't settled on an approach when her email newsletter came through. Then suddenly I remembered a set of Shoo Fly blocks I had from an Internet swap back in the day.


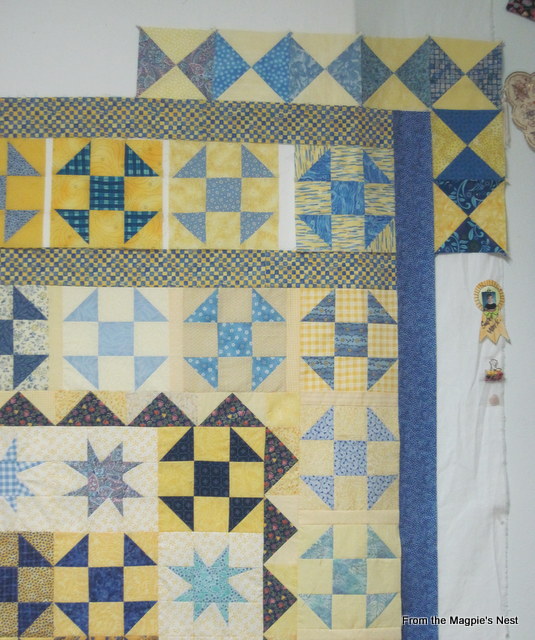
Turns out that "day" was the year 2000! I've pulled these blocks out a couple of times since receiving them but was never able to figure out how to use them. They're not a size I normally work with: 7.5 inches finished. In the picture above I'd just put them on the design wall straight out of the baggie they were stored in. The next thing I did was to take them down according to value. So I had a pile of dark golden yellow blocks and a couple of piles of medium value yellows, and a short stack of very light blocks. I started with the darker blocks...


Originally I toyed with the idea of a strippy format - at the time I was thinking a comfort quilt, slightly less than twin size. But I didn't feel I had anything that would work well for the alternate strips between columns of blocks. That's when the medallion setting came to mind and the dark blocks went up on the wall.

Shoo Fly blocks set right up against each other tend to lose their distinct pattern. I didn't want that so the next challenge was to figure out how to separate the blocks. Using lighter values would help, but what about a different block altogether?


Gotta love those liberated stars! The only math I had to do was to figure out what size background squares to cut: three inches. That gives me 2.5" finished patches for a 7.5 inch block. Now I have a 30 inch central medallion (or will have when it's all sewn together!). But how will I separate that from the next round of blocks?

This is where the math gets dicey. I like liberated, but I also like knowing where I'm going - to a certain extent. I thought about just using strips of fabric to create a frame; you would think that would be an easy solution. Once again, I couldn't find anything in my stash I liked. Then I thought of flying geese units. Since I had four 30 inch sides I made a bunch that would finish at 2.5" x 5" and put them around the center blocks (six 5" geese = 30 inches):


Simple squares will fill in the corners. But now I have a piece that will measure 35" square. That's not readily divisible by 7.5"! In other words, more of the Shoo Fly blocks will not fit evenly around what I have in place at the moment. Another compensating strip is called for. That's next on the docket, maybe after I sew these Shoo Fly and star blocks together. You may have noticed that between this picture and the last I rearranged the Shoo Fly blocks somewhat. I decided to try for a little more variation in value to help the individual blocks stand out more in the end.

Now I'm thinking that I will strive for an 80-85" quilt top. I've found that that's a good size for my double bed, and Luana is asking for bed size quilts in particular this time around. Logistical details are still being worked out but this quilt drive will be in effect for many months. The goal is to collect and distribute 5,000 quilts. And FYI, there's a huge clearance sale going on at eQuilter right now, just in case you need to add to your stash. ;- )

Thursday, November 1, 2012

How Do You Fight the Blues?

With orange of course!


It may not be obvious from these photos, but these tulips will be orange when they open up.


I suspect the adhesive the dentist used to hold my new crown in place is off-gassing in my mouth and affecting my mood and energy level. This morning I felt the need of some retail therapy. It wasn't until I was back at home that I realized I'd purchased not only orange tulips but also a preponderance of orange prints:


I have no specific plans for an orange quilt. Perhaps this is my reaction to feeling left out of the Halloween festivities this year? There's a yard and a half of the multi-color print on the bottom of the stack above. Maybe it will end up in a quilt with the batik parts I was making a while back.

I also picked up a couple more black and white prints for a project I haven't shared with y'all yet.


Just fat quarters and a half yard piece. I could easily have brought home so much more! Unfortunately, I missed all the sales in my local quilt shop and online last month. These purchases were at full retail. It doesn't take much to make a pretty big dent in the budget at those prices.

I don't know whether I will start in again on the new black and white project or whether I will go through my Parts Department to see what I can pull together for a quilt for a victim of Super Storm Sandy. Don't you wish you just go wrap them in a quilty hug right now?