Wednesday, September 27, 2023

Farm Fresh Flimsy

 I've had a hankering lately to do a quarter-square log cabin quilt, sometimes known as a chevron log cabin. I figured the easier way to do it, rather than totally scrappy - which can involve much decision making on my part - would be to establish a theme at the outset. And I 'd been buying new prints that look to me a lot like the type of prints you'd see on old feed and sugar sacks. I had to justify those purchases somehow, right? So I pulled out those prints and some others that looked like they could have been of the era, so to speak. Then I went through my aging stash of novelty prints and pulled out anything that remotely related to farm life. 

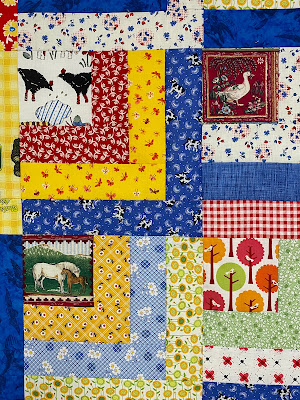
Cows and tractors and chickens

I started with focal squares that finish at four inches and used two inch (finished) strips for the "logs." This makes for ten inch blocks. 

Pigs and chickens, barn cats and a mare and her foal, and another cow in the cornfield.

I was able to cut pairs from most of the novelty prints. I succeeded in using up a fair number of those older fabrics too. 

Gardening tools, more horses, the farmhouse, and the kitchen cat.

I made 48 blocks in total. Only sewed a log to the wrong side of a block once too! ๐Ÿ˜

Chickens, a goose, the mare and foal again, and the orchard out back.

 It was an effort to keep the same print from showing up too close to itself, and I didn't always succeed, but I'm very pleased with the results. Overall the quilt will finish at 60" x 80."


 I already have backing fabric in house. This will probably go to a child in Foster Care in our area. Now, what to tackle next? 


Friday, September 15, 2023

Scrap Happy in September - Great Grandma's Scraps

 I've done some of my usual scrap cutting and subsequent block making for the Parts Department since our last Scrap Happy Day.


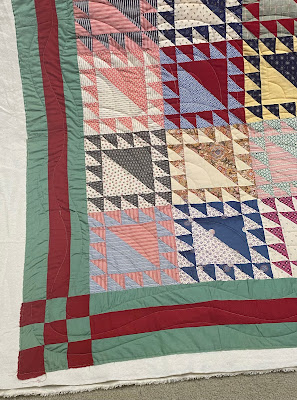
But more exciting than that, my great grandmother's Lady of the Lake quilt top has finally been quilted! 


It's made entirely out of scraps, aside from the border fabrics I assume. It would seem I come by my love for scrappy quilts honestly. ๐Ÿ˜


This great gramdmother passed away in 1945. She and her husband lived and worked on a farm on the western side of the lower peninsula of Michigan until 1942. At that point their health was failing and they went to live with my grandmother (their daughter)  and her family until they passed. Sometime between 1942 and 1945 Grandma Eva spread out the quilts and quilt tops she'd made and had her grandchildren, my mother among them, choose the quilt they wanted. There was a completed crazy quilt, another crazy top, a hand quilted Irish Chain quilt made by her mother-in-law, and a Double Wedding ring top. If there were others - there were 6 children in that family - I haven't learned about them and don't know what might have happened to them. I have all of the ones mentioned in my possession currently. 


This quilt top measured roughly 75" x 90." I was given a queen size cotton and wool batt some time ago through the generosity of my friend C~; this seemed a good time to use it. Unfortunately, it was much thinner than even the Warm & Natural I generally use in the quilts I make. Too thin in fact. So we paired it up with another low loft batt. 

I'm glad we did. The quilt is wonderfully cushy even before laundering. Not that I plan to launder it right away. There are tiny, tiny holes in a few places. Mostly I want to preserve it from further deterioration and have it on display.

I love all the colors and prints that went into this quilt. Well, except maybe the red and green for the borders. That has never been my favorite color combination. And the application of the borders was a bit wonky. But I figure this was made toward the end of my great grandmother's life. As I approach the same state of being I can appreciate that her skills may not have been what they once were. Overall I'm thrilled to finally have this top  quilted up. I just need to figure out what to do about the binding. It's not like I'm going to be able to match that green! I might stand a better chance with the red, but even then I'm not confident. I may end up using some other dark value pulled from the body of the quilt. It will be a job to get the excess batting and backing cut away too. I may have to find a place for that task that's more spacious than my usual cutting table. 

Here are a few detail shots:

See how the 9 Patch corner block sort of droops?
That will be a challenge to cope with when I prune the quilt prior to binding. 


Scrap Happy Day is hosted on the 15th of each month by Kate in Australia and Gun in Sweden. You will find their links at the top of the list of others who strive to turn their scrap materials into something beautiful and/or useful. I've had some technical issues prior to getting this posted so I'm a bit late this time around. If ever you are in need of inspiration just check out all the links below!

KateGun, Eva, Lynda,
Birthe, Turid, Susan, Cathy,  Tracy, 
JanMoira, SandraChrisAlys,
ClaireJeanJon, DawnGwen,
Sunny, Kjerstin, Sue LVera, Edith
Ann, Dawn 2, Carol, Preeti, NรณilinVivKarrin,
Amo, AlissaLynn, Tierney and Hannah

Sunday, September 10, 2023

Just Because in Denim

I've debated whether to save this for Scrap Happy Day - which is right around the corner - but wanted to share before I forget to do it at all. 

Suddenly we've had a rash of worn out blue jeans. We are not of the generation who thinks it's a fashion statement to go out in public in ripped jeans. However, there's still a lot of good denim remaining. And I have come to love a frayed edge. So I ripped some strips off one leg of a pair of jeans, starting at the rip that was already there. I kept the strips at a width I find comfortable to hold in my hands for slow stitching/embroidery. (Really, the term slow stitching pretty well covers what I tend to do with thread and embellishments on fabric. I'm not one for the complex embroidery stitches or fine technique anymore. I prefer simple, straightforward stitches and adding charms and beads and things to complete whatever picture or story I'm trying to convey. The Perfectionist dwelling within can just go sit in the back of the room and keep quiet.) This is what I ended up with. You can see the hem from the bottom of the pant leg on this cover of my denim book.

The first page I chose to decorate is actually the last page of the book. I watched videos from Emma Freeman on YouTube in which she shared her use of seed stitches to create patterns that give the impression of text. I was really taken with that and wanted to have a go myself. This was the place to do it. I used some cotton crochet thread I'd picked up secondhand. Next time I will use a stouter thread if I do more on denim.

I also added a strip of vintage lace and an old button I believe is Mother of Pearl (MOP). So this page definitely qualifies for Scrap Happy Day! 

I've been buying pieces of crochet as well as laces lately. Someone else has sourced the original work and cut it up specifically for those of us who enjoy using these salvaged bits in our art work. One such piece was a perfect fit on the cover of my book.

I may end up doing some further embellishment of the cover but for now I'm content to showcase this lovely piece of crochet (a skill I haven't been able to master). 

One of my recent acquisitions was a wide strip of vintage lace. A small section of that made for a little pocket on another page of my book.

Then I felt compelled to make a little journal to go into the pocket. I used a discarded library return card for the cover and some scraps of various papers for the signature inside. I chose to use a small piece of a handmade paper (again, someone else's cast-off) to alter the front cover of the little book. I've finally found a paste I can use in place of the glues my body finds so toxic.

The sunflowers are a vellum sticker.


One of the pages in my denim book came from the original hole in the jeans. That edge created a natural thumb notch for a pocket. I stitched along that edge to help strengthen the fibers. There was further weakness in that section of denim so I did some weaving with floss over that area, then added a couple of tiny buttons for visual interest. It looks like a large flower pot or urn to me.

By the time this page was finished I had created a flower bed complete with visiting snail!

I sewed this page to the one behind it (which is the first page I showed you) to turn them into a larger pocket. I'm not sure yet what may end up living in that pocket. For the purposes of demonstration I have slipped a piece of paper into the pocket in the photo below.


There will eventually be four pages between the covers of this book. I have one and a half finished at this point. I love the way this feels in my hands. It's so soft and tactile. I want to continue to use little treasures I've acquired along the way, things that are special to me. It's time - past time! - for these little things to be given a home where they can be enjoyed and not merely stored away out of sight. ๐Ÿ˜Š