Saturday, December 12, 2015

Baby Steps

It's been a tough week.


Several toxic exposures and subsequent recoveries slowed down productivity in The Magpie's Nest. Eventually I was able to begin auditioning the little blocks I'd been making for the borders on the twin's rainbow quilts. The first hurdle was to figure out how to lay out both tops with room for the border blocks above and below. I couldn't find a place to lay out both tops simultaneously so I used my bed and the design wall, in two different rooms (but only steps away from each other).


My goal was to distribute the images in the stars and the colors in the blocks as evenly as possible between the two tops. Of course I ended up with a couple of spots where nothing I had would work and new blocks had to be made.


Then there was the matter of doing the math to make the blocks fit the width of the flimsies. Hard to do with a broken brain, let me tell you! In the end the sashes are three quarters of an inch wide and the border strips are framed with half an inch where it will be seamed to the lower edge of the flimsy and one inch on what will be the outside edge. Once the borders have been put on the bodies of the quilt tops I plan to run a 1.5" border strip down each side so all the blocks will appear to be floating on the white ground. I don't yet know just what the binding will be made of but I do know it will be a dark color to frame the quilt tops.

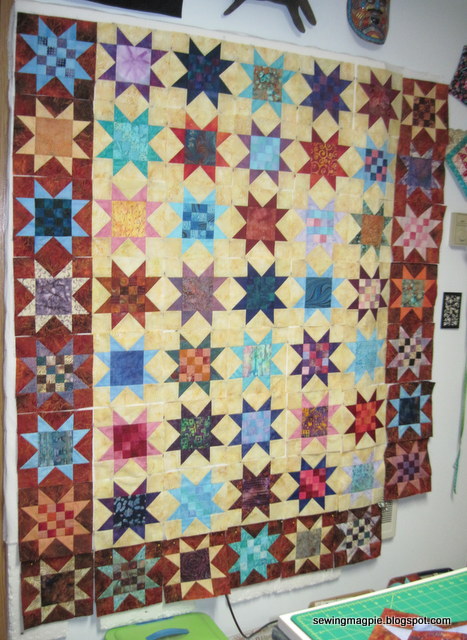
When I finished building the borders I gave myself the reward of using scraps to make a couple of sawtooth stars. I went ahead and sewed up a couple of little Hole in the Barn Door blocks too.

\
You can see at the extreme right side of my design wall that the Diary Quilt has been growing steadily. There have been a couple of days when it was a challenge to find an appropriate print for the day. So far though, I've come up with something before the next day gets very old.

I'm linking up with SoScrappy for the Rainbow Scrap Challenge. I'm pretty sure I'll be making sawtooth stars next year whether or not I follow along with Angela's quilt plan. :- )

Thursday, December 3, 2015

December Stars

Look who's been visiting The Magpie's Nest:


One of the quilting fairies!

The rainbow Ohio Stars have been assembled into quilt tops for the twins. They aren't quite long enough as is however, so I've been making six inch stars this week to use in top and bottom borders.


I'm planning on 36 total. I'm about 2/3 of the way there. Before I make any more I want to begin auditioning placements so I will have good color balance.

I've also made some 8" stars. The first ones will go into the Parts Department for future use.


But four have been turned into potholders for gift giving. :- )

I made up two of these:


And this pair:


On the blue ones I simply quilted in the ditch (mostly) around the center square. But I couldn't resist the opportunity to break out the iridescent thread for the red stars.


It's been so long since I've used decorative threads or stitches, and I was so excited, I forgot to reset my thread tension. Only broke the thread once before I realized what the problem was though! Hopefully this set will be restricted to decorative purposes. I doubt that synthetic thread will hold up to high heat.

I can't yet show you the other things I've been working on. ;- ) Hopefully I won't forget to do that!

Friday, November 27, 2015

Beginning a Quilt Diary

So as I was touring the Rainbow Scrap Challenge blogs a couple of weeks ago I started noticing buttons for Quilty 365. I followed the links and learned about the circle project Kathy over at Quilty Folk has begun.


I like the concept of a daily record in fabric for a year of life but circles and applique are not for me at the moment. I spent several days stewing over ways to adapt this project to my own style and taste. I came up with a couple of ideas I thought were workable but finally decided to just cut a 2.5" x 6.5" strip each day. I considered assembling the strips into blocks but decided on columns for an eventual strippy format quilt. I'm not sure exactly how many strips will go into each column or how many columns there will be in the end but I can work that out next November. ;- )

Obviously the first strip had to represent all the figuring I'd done before the project even got underway.


The next day was wet and stormy, blowing the spider webs in the hedges all over the place. The yellow strip is for Mr. Bingley. That was the day he passed away. I may yet ink his name and dates on the strip, I haven't decided. The bottom strip in the photo above was to celebrate the fact that I'd actually done some sewing that day.


I've chosen to use white prints for Sundays. I plan to either ink or embroider a scripture reference on those strips. I felt truly ill on that Monday but much better on Tuesday. My son who played the tympani in orchestra had his birthday on Wednesday. I found the perfect vintage print for Thanksgiving!

So far it's been fairly easy to choose an appropriate print for each day. I have a sinking feeling that may already be at an end. I'll have to come up with a back-up plan for those days that have no stand-out experiences I guess. Maybe just a strip of whatever fabric I used that day.

I've been making more sawtooth stars this week.


I'm pretty sure I'll be making them next year as part of my participation in the RSC16. I may actually make the blocks that Angela has chosen for the year too. There are going to be more Ohio Stars, primarily in orange I think. And there will always be six inch Shoo-fly and Hole in the Barn Door (or Churn Dash) blocks!


I'm linking up with the other rainbow bloggers over at SoScrappy.

Saturday, November 21, 2015

A Flight Over the Rainbow Bridge

It's been a challenging week here in The Magpie's Nest. Most significantly, my little canary passed away. His health had been sort of up and down the couple of months. I've only had him for 4.5 years but he must have been at least a year older than that because male canaries don't sing until they're a year old. Seems like a pretty short lifespan, even for a canary. I'm hoping the next one will stick around longer. I keep glancing at the empty cage, expecting to see that bright bit of yellow.


It was a struggle but I managed to get the two sets of blocks sewn into flimsies for the twins (see previous post). All week long I had trouble getting seams to line up properly! The tops still need borders before I can call them finished. I just didn't have the heart or the brain power to work on that. I made up some friendship blocks for members of my local guild and puttered around with more postage stamp stars.


Gayle, please note the yellow Grandmother's Choice block in the middle of the bottom row. It will be all of five inches square when finished. ;- )

My favorites of this bunch are these two 8" stars:


This morning I've made up a couple of Ohio Stars out of leftovers.

9" Ohio Star

12" Variable Star
The center patch of this star features a cut of the Gettysburg Address.

I'm linking up with the other Rainbow Scrap bloggers and looking forward to learning what Angela has planned for next year. :- )


Saturday, November 14, 2015

Altogether Scrappy

In terms of progress on my Rainbow Scrap Challenge efforts this year I have two quilt tops ready to assemble, one for each of my twin granddaughters. I made about a dozen blocks specifically for each girl and then used my rainbow Ohio Stars to fill out the quilt tops.

Quilt #1:


And quilt #2:


So far they are still just loose blocks. I'll get the tops assembled one of these days. ;- )

After hearing the tragic news out of France I turned to piecing little squares (1.5") to maintain my sanity.


These stars will all finish at eight inches square.


The points of the star above were cut from a strip of fabric generously given to me by a member of the F2F swap.


It felt good to use up my odd black square patches.

These postage stamp stars are one of the options I'm considering for my RSC next year. The only thing that's certain at this point is that I'll be working with smaller scraps than I did this year. In the meantime, I'm linking up with the other RSC bloggers over at SoScrappy.


Thursday, November 12, 2015

Needlebook Finish

Over the last couple of days this...


Became this:


And this is the finished product:

front

back

I broke up the large patch on the back with a line of beading. Once I'd done that it became easier to fill in with beads and charms, my favorite way to decorate textiles. I avoided the whole spider issue with a riff on Kate's butterfly suggestion. Look closely and you'll see that I've sprinkled the background of nearly all the patches with clear seed beads, just to add a bit more sparkle.

Here's the inside:

The colors look better in person, trust me!

The cover itself is lined, and then I add two flaps that create pockets when the wool felt pages are sewn in place. The pockets will accommodate small scissors, bobbins of thread, a needle threader, what-have-you. You could even tuck a credit card in there! You know, in case you have to shop online while you're stitching. ;- )

Now to decide whether to break this one in myself or keep it in its virgin state for future gifting...


Monday, November 9, 2015

Time for Some Slow Stitching

I've been building pretty good size quilt tops of late. Yesterday I felt the need of something smaller, more intimate. Didn't have it in me to begin a brand new project so after some rummaging around I came up with a needlebook cover I'd started many months ago: 


This was what the front looked like when I abandoned it. The first thing I did yesterday was to remove about 50% of the embellishments. I changed out the yellow flower beads for purple ones and did some lazy daisy stitches down either side of that panel in perle cotton (size 5 I think).


The stitches are a bit dorky looking to me but I pressed on, inspired by this bit of metal I found in a local bead shop recently.


This is how the whole cover looks today:


I used seed stitches in a variegated embroidery floss in that central panel. That's where the cover will fold so I wanted to avoid three dimensional embellishments in that area. 

Here's a closer look at the upper left corner:


The owl and the branch on which he's sitting are two separate bits of brass. There are still two rather large areas I have to figure out how to decorate but I'm pleased to have made this much progress, especially when this project stalled so early in the process originally. 

For those who are new to The Magpie's Nest, this is the first needlebook I made, the one in which I keep my hand sewing needles:


It's made of printed corduroy scraps. I wanted one that was a little less bulky and maybe more summer-like in color. Now I'm not sure I'll be keeping this one for myself. I hesitate to put a spider web and resident on a piece when someone else might be creeped out by it!


Saturday, October 31, 2015

Starry Flimsy

Between other events happening around The Nest this week I managed to get all my sawtooth stars sewn together.


But I wanted it just a bit wider. It's only 56" (finished) wide at this point. Once this is quilted and laundered it won't even be that wide. So I decided to add two inches all the way around. I didn't have enough of the dark brown batik that surrounds the outer stars to do that but I did find another brown batik in my stash.


So now the top will finish 60" wide by 76" long. Wonderful! Now all I need is a name for this quilt. Well, and a backing (and batting and binding!). I'm considering some delicious hand dyed yardage that I've been hoarding for years for the back. They are single-yard cuts, and don't really go together, but I can't bring myself to cut them up. I knew from the beginning that I would keep this quilt for myself so I may as well put some cherished fabric on the back, right? ;- )

And now for the really big news:


Our son has purchased one of the long-arm quilting machines that were in the shop in which he was working and is going into business for himself!


We've been moving furniture and things around to make room for Freddy, as this particular machine is known (christened by it's first owner), in what was James' bedroom. There's fine tuning to be done but we expect things to be up and running within the week. Woohoo!

I'm linking up with the other RSC bloggers.

Sunday, October 25, 2015

Scrappy Stars from June to October

We have been fortunate in this household that the cold our son brought in hasn't been terribly virulent. When I started to feel more like myself again I put my light batik and hand-dye stars back on the design wall. Eventually they ended up in these positions:


These are the stars that were inspired by the packet of hand-dyed fabrics I won in June. They are 8" finished, so at this stage the top would have been 40" x 56." Here are the brown background stars I made to make the top bigger:


You may have noticed that the top row isn't in place. I have blocks set aside for that and am hoping they will look good when I finally shift everything downward. Two of the stars I showed in my last post have been remade. I just couldn't live with them the way they were. Now I'm not even sure which two stars they were! 

These blocks have been on the design wall for several days now. Tweaks have been made to block placement during that time. For example, the dark star in the center right column below had to be taken out.


I replaced it with one from somewhere else in the border.


Actually, I think the two stars I changed are the bottom two you see on the left in the photo below.


The lavender one had lavender points, making it very dark and low contrast, and the one below it had the garish turquoise points. I put the lavender points on the 16 Patch and cut new, lighter points for the lavender star. Much better - at least to my eyes. :- )

Now I have the top arranged thus:


The block that goes in the corner is on the floor. There's nothing to pin it to in that spot!

I hope to get this sewn together early this week. We've had to do some serious moving of furniture and junk in the house or I'd have it done already. Hopefully I'll be able to show you why things had to be rearranged very soon. :- )

I'm linking up (at the tail end again!) with the other RSC bloggers over here.