When I was planning to create a border of Bow Tie blocks around my latest Parts Department quilt I discovered that I didn't have quite enough to get all the way around. It didn't take long to make another dozen.

Let me show you how I do it. :- )
Six inch Bow Ties are a great way to use up 3.5" and 2" patches. You need two 3.5" squares of two different prints, and two 2" squares of whichever print you want to be the Bow Tie (as opposed to the background). For the purpose of this tutorial I'll use white for the background and a black print for the Bow Tie and its' knot. We'll be piecing one part of the knot of the bow tie onto the two background squares.

Lay the little square right side down on top of the larger square, placing it right up into the corner and aligning two raw edges. Then you'll want a smallish acrylic ruler marked in quarter-inches. Lay your ruler on top of the two patches with the quarter-inch line running through the two opposing corners of the little square.

I have an overhead light making a reflection on the ruler. Here's a close-up:

See how the quarter-inch line is running right through the corner of the patch? This process eliminates the need to draw a line down the middle of the little square. Even if the two patches shift on their way to the sewing machine it's easy enough to line them back up again.
Once you have your ruler placed accurately use your rotary cutter to cut off the little triangle not covered by the ruler.

In this case I throw those little triangles away. When I'm making 3" x 6" flying geese I keep the off-cut triangles and sew them together to make my scrappy Broken Dishes or Pinwheel blocks.
Sew your altered patches together with a quarter-inch seam allowance. Repeat the process with the other little square and background patch.

The next step is to pair these units up with the remaining 3.5" patches to create your bow tie. Here's what the back of my block looks like before I sew the final seam:

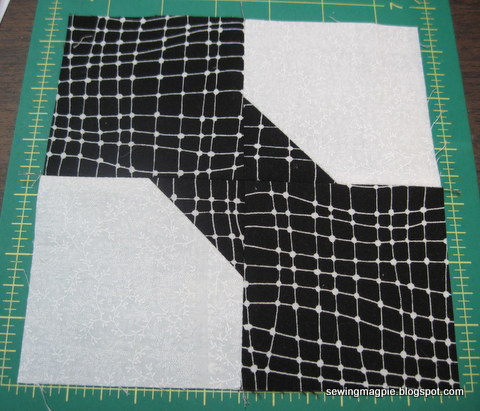
And here's the completed block:
I like to use these blocks between seams (as leaders and enders) when I'm working on other projects. The seams are all short and the block is simple to assemble. Now to decide whether to make a scrappy Bow Tie quilt out of these blocks or to hang onto them to use as a border in the future!
It's such a versatile block, you can make all kinds of shapes with it, and your recent post showed that it makes a great border - just not for that particular quilt. Welcome to ScrapHappy, hope to see you again next month!
ReplyDeleteThank you for the tutorial Sue... and nice to meet you at ScrapHappy October!
ReplyDeleteI like that method of piecing Sue - it looks like it might be more accurate than drawing a line through the square. Thanks for the tutorial.
ReplyDeleteGlad you shared this!!
ReplyDeleteI love this idea of cutting before you stitch those corners! Thanks so much for taking the time to post this Sue. I will be making blocks soon using your idea.
ReplyDeleteThat's a great tutorial for this block. That's how I made an entire quilt for my husband from scraps, sitting in the living room while he watched TV, many years ago. He loved that quilt and would never let me change it from the bed, so it's well used now. This was a good reminder that I could change to something less boring when I get tired of a leader-ender. =)
ReplyDeleteI also have leaders and enders when I sew! I think it´s a brilliant idea. Your bowtie will make a great border!
ReplyDelete