Tuesday, April 30, 2013

Returning to an Old Love

I have been involved in one form of needlework or another since grade school. I started with simple embroidery but moved on to latch hooked rugs during my teen years. Then I discovered needlepoint. That's how I spent my leisure time during my twenties. Well, it was my medium of choice. In my experience needlepoint was always one of the more expensive forms of needlework. I didn't often have the funds for all the stitching I would have liked to have done!

I was busy having and raising children during my thirties. The sharp needles and scissors and expensive wool yarns were put away. Gradually I acquired rotary cutting tools and started piecing. As the children grew so did my piecing skills. I still couldn't indulge as much as I would have liked. Time was the issue more than money in this case however.

Faithful readers know that I still enjoy bouts of hand sewing. So far my plans to continue with a personal beading project this year have not born fruit. Since my last post I've been stitching down bindings. Apparently that was insufficient. A new Keepsake NeedleArts catalog came in the mail one day and I found myself ordering a nifty pair of swordfish embroidery scissors and a small needlepoint kit. (I do not need another pair of little scissors, but these were just too cool to pass up!) The kit was for a coin purse/credit card case:


The beauty of this little project is that it comes pre-finished. With a zipper all the way around the needlepoint canvas all I had to do was stitch between the lines. I amazed even myself by completing the stitching in a matter of two or three days.


And that wasn't enough! I'd cleaned out most of my old needlepoint canvases and projects over the decades but I knew there was at least one still lurking in the depths of the studio closet. It took a while but I finally found it:


I don't remember where I acquired this. I certainly was never in Boca Raton, Florida! My best guess is that I picked it up in a shop when I was living in South Carolina. Which makes this project potentially 35 years old. There were two slightly rusty needles still threaded with floss in the bag. The canvas had been rolled up for so long that I've been having to fight the scrolling ends to do the stitching. You can see that the tape that came on the canvas has dried out and fallen off. I have a raw spot on my hand where I keep rubbing against that rough edge. (Maybe I'll tape that back up today...)


This was meant to be a belt when completed so the design area is only 1.25 inches high and 34 inches long.


All the fish have been stitched, although some need their eyes put in. There's a bit of seaweed yet to be stitched at the far end of the canvas.


The fish, seaweed, and bubbles are stitched in cotton floss. The background is a wool yarn. When I pulled this out there was maybe five inches of background stitched. Now I've covered nearly 20 inches. My family will tell you that I've been stitching almost compulsively.


I have no idea what I will do with this when the stitchiing is done (in another day or two!). While I could use a belt I doubt it will actually be made into a belt. Meanwhile, I've been back through the catalog to have a closer look at other needlepoint projects... ;- )

Wednesday, April 24, 2013

An Experiment

So after working on that medallion quilt with a variety of block patterns I needed something nearly mindless to sew. What could be more mindless than string blocks? I didn't even try to keep the central starter string the same color or value (although it often ended up being a dark print).


I started with six inch blocks. It was fun to play around with the various setting options.


At some point I realized that I could switch to eight inch blocks and use both sizes in the same quilt. So I did! If you look very carefully at the photo below you may be able to pick out the two rows that are made up of 8" blocks. Of course here they're just raw blocks on the design wall:


I tried to make a zig zag set work...


But I liked the more common setting better. I have all the six inch blocks squashed together in the middle of the quilt and the 8" blocks were added to opposite ends to add length. The top finishes at about 48" x 62" (outside! In the sunshine! Woohoo!).


The one thing you may be interested in that I did differently with this project was to piece my strings right onto batting rather than other fabric or paper. I cut my batting squares from those strips that get cut away after quilting, and I cut them at exactly six and eight inches. Then when I trimmed the blocks to size I worked from the backside so that I could easily get a quarter inch seam allowance all the way around. I was a little nervous about sewing these bulkier blocks together but it worked out okay. The real trick was pressing the seams. I chose to press them open. My stiletto was crucial to this process!


If I were to do this again I might consider leaving half inch seam allowances. Of course that would mean leaving the strings hanging over the edge of the batting squares by a good bit before trimming. In this case it was worth it to me to take the time to press these seams open because my plan is to lay this onto the backing fabric and secure the layers together by using a wide stitch on my sewing machine to decorate the seam lines on the front. Once I choose which stitch and what color thread to use that should also be a fairly mindless process!

Friday, April 19, 2013

Parts Quilt Part Two

Why yes, I did use the liberated stars next. ;- ) I rearranged them and had to make a few more but I liked the way they looked at this stage of the game.


The top was square up to this point. I knew I wanted a rectangular quilt in the neighborhood of 60" x 75" when it was done so at this point I picked two sides to elongate and added 3 inch strips to those two sides. Then I pulled out my scrappy six inch Bow Tie blocks to create end borders.


I really like using them in this zig zag formation.


Time for outer borders to finish it up!

I thought this old calico would do the trick.


I was wrong. Almost as soon as I sewed the strips on I took the quilt off the design wall, and worked on something else for a couple of days. In the back of my mind I knew I wouldn't be able to live with this for the final border. I just wasn't willing to face the reality of the situation. Some part of me knew I was going to have to take it all off or change it up somehow.

After sleeping on it for a day or two the solution for changing it up occurred to me. Rather than taking the calico off altogether I cut it down to finish at one inch wide. Then I added the two inch dark red calico border.


Much better. :- )


I found a lovely large scale dark red floral print to back this - didn't get a picture of it for you though, sorry. I'm really pleased with the way this turned out. It's so warm visually. Hopefully the recipient will think so too!

Monday, April 15, 2013

Creating From the Parts Department

You know I've complained that my Parts Drawer is overflowing. I finally decided to do something about it. Of course there wasn't a block in there that felt like the right one to begin the medallion quilt I wanted to make! So I stitched up a 12 inch Twin Star just to set the stage for the rest of the quilt. After some fiddling around with various options I used 3.5" x 6.5" flying geese units and four 3.5" squares to enlarge the star:


All that contrast between light and dark really sings, doesn't it? :- ) I struggle with achieving contrast most of the time. 

My first choice for the next round was 9" liberated stars:


It didn't really work for me. Too crowded or something. So then I got out the bags and bags of 6" Shoo-fly and Hole in the Barn Door blocks and played around with them on the design wall. I tried all Shoo-fly blocks around the star, I tried Barn Door blocks all around... This is the configuration I liked the best:


All those 6" blocks had to be framed up to 9" in order to fit nicely around the now-18" Twin Star block. I didn't have a lot of 2" strips already cut but it gave me the opportunity to make some, using more of those old prints, and to use a few of the 2" bits I'd pieced into strips between the seams of other sewing. (Two inch strips finish at 1.5", and 1.5" added to either side of a 6" block makes a 9" block.)


At this point I was really happy with the way it looked. You should be able to super-size the pictures by double clicking on them. But since this was intended for an adult it had to be bigger. Time to get out the 9" liberated stars again!


I'm not saying this is what happened next. You'll have to come back in a few days to see the end result!

Wednesday, April 10, 2013

Bears and Ducks and Scraps, Oh My!

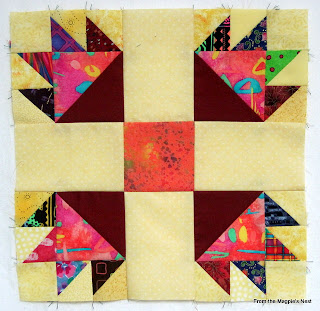
Back in the early days of my quilt making career I had a goal to someday make one of these Bear's Paw quilts:


Suffice to say it never happened, and probably won't now because I've evolved as a quilt maker. Not that I could ever have made that many half-square triangles in only two fabrics!

Recently I ran across a picture of an antique Duck's Foot in the Mud quilt. It struck me that the pattern was very similar to the Bear's Paw, and that made me wonder exactly what the differences might be. The best way to find out? Make one of each!

I was able to rustle up sufficient scraps from my stash to make one 12 inch Duck's Foot in the Mud block per the directions in the old magazine.


Next I drafted a pattern for a 12 inch Bear's Paw block. This time I cut patches specifically for the block.


The two significant differences? A Duck's Foot starts with two large-ish HST's while the Bear's Paw begins with a whole square. The other difference is that the sashing between the duck's feet is wider than the strips that separate the bear paws. I think Bear's Paw is most often made up in only two colors. I've only seen the one Duck's Foot quilt and it appeared to have been made from a limited number of prints which could have come from a scrap bag. I thoroughly enjoyed making it out of scraps. I'll have to keep it in mind as I try to use up scraps in the future.

Meanwhile, between piecing the seams of these blocks I was sewing together the triangles that come off my flying geese units.


I really like flying geese units made from rectangles and squares as leaders and enders, and when I run out of them I have the triangles to turn into Pinwheels or Broken Dishes!


Sunday, April 7, 2013

Between Seams, Between Projects

So while I've been working on the Scrappy Trips blocks and another project I have yet to show you I've been sewing up scrap patches into six inch blocks for my Parts Department.

Shoo fly blocks and framed squares:


Bow Ties:


And flying geese:


These are the blocks I make most often between seams. When I cut up my remnants I generally cut 2.875" half square triangles (HST's), 2.5" squares, and 3.5" squares. Since I made those string quilts last year I've been cutting 2.5" and 3.5" strips too. Sometimes I get 3.5" x 6.5" rectangles for flying geese out of my leftovers. When I know I'm going to make Bow Tie blocks I cut 2" squares. I don't use that size/shape very often otherwise.

I tell you all this because I had one of those days in the studio recently. I store my pre-cut patches in tins just under the tabletop where I do most of my machine sewing. Generally the tins are safely out of the way and/or the lids are snugly in place. On this particular day that was not the case. This is what I ended up with:


I had to walk around the mess for a couple of hours before I could face reorganizing them into their neat little stacks in the tin.

I have some goodies to show you too. :- )

I found these cool knee socks locally. How could I leave them in the store???!! The shop carries about a dozen different patterns, all of them wonderful and colorful. I'll be adding more to my sock drawer for sure. You can check out all their designs and order your own here. It's almost time for a new journal too, and this bird makes me smile every time I look at it. And how could I leave those batiks behind?


Last but not least, a friend of mine found this set of glasses in a store I can't safely go into:


Mexican sugar skulls, and the bottom of each glass is coated in a different color. When I saw a picture of them I all but started drooling. Fortunately Heather was willing to go back, they still had some in stock, and now they're mine, all mine! bwaahaahaaa!


Thursday, April 4, 2013

Sunbreaks in Scrappy Trips

I have a lot I could share with you because it's been so long since my last post! I sew when I'm functioning well and then don't have the energy to do a blog post. {sigh} Such is life.

I have finished making the Scrappy Trips blocks I was working on recently (inspired by Nifty). I kept a yellow print in the middle of my blocks and the rest of the prints came from the older pieces in my  stash. Some demon in my soul made it harder than it needed to be by challenging myself not to use the same print more than once. There was a wide stripe that I did use more than once because each stripe looked like a different fabric! ;- )

One thing I was anxious to do was to try out various settings for these blocks. Here's a zig zag arrangement for example:


And here's something more on the order of a traditional Trip Around the World:


This is the Sunshine & Shadows arrangement I thought I might use originally:


Eventually I decided that this set of blocks would really look best in the Many Trips setting. (Although, looking at these pictures I find I'm still drawn to that Sunshine & Shadows setting!)


It took a while to find just the right configuration. I would have been happier a lot sooner if all the yellow prints had been of the same strong value.


It worked out best to have the darker yellows through the middle of the top and the pale values toward the edges. Well, in my opinion anyway!


I had an intended recipient in mind when I started making these blocks. Now I'm not so sure that's where it will end up. It's 60 x 72 inches now, which would be fine for a couch quilt. If it goes to Foster Care instead I may add borders to make it a little bigger for a teenager. And of course I've had ideas for using this technique with other sets of colors and prints. Haven't started any of them yet but they're percolating! :- )