I have fallen way behind with my ATC's for this year's BJP. However, I am not bowing out by any means. I have every intention of continuing, catching up, and completing the year's worth of projects. Mostly I'm telling you this because I've had an experience this morning that I need to respond to and beading may be the best way.
There's a tiny older house in the neighborhood that I've passed at least once every week since we moved here in 2002. I think it was shortly after we moved to this part of town that it received a paint job I thought was absolutely adorable and completely fitting to the house. In broad strokes it was pink and purple, but believe me when I tell you it was done in the most tasteful and charming way possible. It was a happy little house, with flowers around it that echoed the colors in the paint job. A storybook cottage if ever there was one, inhabited by a grandmotherly looking woman who obviously had a lighthearted spirit about her.
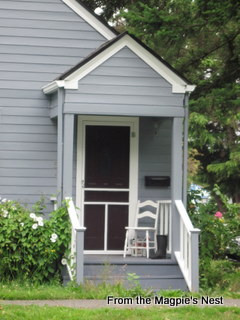
Over the last several months there have been changes that have led me to the conclusion that the home's owner had to move out, possibly passed away, and the home has changed hands. I don't know whether it has been sold or just passed down in the family. I had hopes that it would be maintained as it was but it appears that is not to be the case. Today when I drove by I was shocked to see this:

It now looks like every other house on the street, only with a fresher coat of paint. BO-O-RING! The happy little cottage used to catch your eye as you drove by. Now it blends in and you don't notice it. I had to look for it in order to take these pictures. (I regret that I never took pictures of it in its' glory days.) Even the flowers look like they've been changed out. All the delightful accent pieces have been painted white to match the trim.

I realize that Realtors encourage folks to paint their homes in socially acceptable neutral schemes to get the sale they want. I realize that crisp and clean is au courrant. I also realize that I live in the Pacific Northwest, not Florida, and color sensibilities are different here. People up here seem to be afraid of color. They want to blend into their surroundings. They wear the same colors you find in the scenery around here, and they paint their homes in ways that also blend in. I don't belong here.
This is more my style!
 So I'm thinking that at least one of my ATC's for the Bead Journal Project this year needs to address this issue. I need to find my most exuberant colorful self and let her have her way with my fabric and beads...
 Then I cut two 3.5" squares and four 2" squares of yellow and turned two of those rectangles into a 6" heart block using the technique I shared with you in this post.
 That was one of the blocks that were sitting on my design wall when I returned from the fateful trip wherein I discovered that the cute little house had been repainted (see previous post). I was thinking about the Bead Journal Project and how I could journal about what had happened to the house, in beads, on an ATC. Rummaging through my stash I found a large scrap of a print I felt captured the spirit that house once had. It was too big and too busy for a tiny ATC though. That's when the heart block caught my eye.
  My intention is to make a Priority Quilt for AAQI, honoring the spirit of the home's previous owner. I haven't quite settled on the rest of the design or process yet. I spent yesterday catching up a bit on older bead journal projects. That will be a post for another day. ;- )