I'm beginning with 3.5" x 6.5" rectangles and 3.5" squares, one rectangle and two squares for each goose. (You can use whatever sizes you want of course!) Next to my sewing machine I have a small cutting mat, and I keep a rotary cutter and 6" ruler there too.
 The rectangle will be the goose and the squares will be the background. At least, that's the way I interpret these units! Begin by laying one square, right side down, on top of the right end of your rectangle. At this point I think most folks would have you draw a line diagonally through the square, from corner to corner, and then you would sew on the line and remove the excess. I can't be bothered to draw any lines. I just lay the ruler on top of my fabrics with the one quarter inch markings falling on that invisible diagonal line corner to corner.
Here's a close up of what I mean:

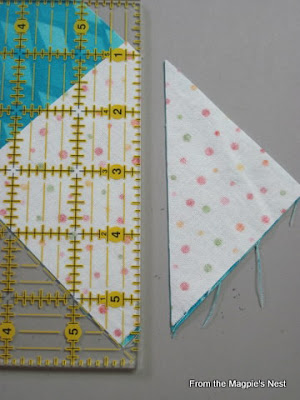
Now I'm going to cut away the excess fabric. This will leave me with a perfect 1/4" seam allowance built in.

I put what's left of the rectangle and the square under my presser foot and sew the seam. You should note that I have a 1/4" presser foot on my machine. I'm not sure this technique would work for those who do not have an easy and reliable way of creating a quarter inch seam. I haven't done it with any other foot!

I also run the cut-away triangles through the machine and I have this:

Next comes what I find to be the trickiest part of the process: getting the second half of the unit made correctly! Lay out your second square on top of the rectangle, right sides together again but at the other end.
 In order to have the background print end up where I want it, I have to turn the whole shebang and work from what would be the top or the point of the flying geese unit. Also, because I'm right handed, it's easier to cut that way.
Lay your ruler on top of the fabrics again, with the quarter inch marks along that invisible diagonal line from corner to corner of the background print. Cut away the excess, creating your built in seam allowance. You will be cutting off the merest tip of your previous seam; don't worry about it.
You see, instead of drawing a ling and then sewing and cutting you just create the line with your ruler and make the cut first, then sew! When you're all done you should have one Flying Geese unit and two leftover half square triangle units. I leave my triangles as is and sew them into Pinwheel or Broken Dishes blocks but they can be trimmed down to a consistent size and used in any number of ways.

Lovely geese! I just love how all of our minds work differently and how many variations and different ways of doing things that there can be! I'm finding a way to add your technique to my 'flying geese' links in my list of quilt blocks etc.!
ReplyDeletewow. that was really simple!
ReplyDeletethanks for sharing~
Cool! I've never made this block before, now maybe I will try it.
ReplyDeleteWhat a great quilting lesson! Beats the &*$#** out of drawing lines on all those little squares.
ReplyDeleteMy next quilting goal is to learn how to do triangle pieces. So thanks for this post!
ReplyDeleteVery clever! Can't wait to try this.
ReplyDelete