Showing posts with label organizing. Show all posts

Thursday, December 31, 2020

Final Post for 2020!

 It seems appropriate to have a weird ending to a weird year. I couldn't sleep last night. Had to turn the light back on to record all the ideas I suddenly had for the various projects and potential projects on my books. That's happened on occasion before but it's still an unusual event in my life. 😊

I'm not one for specific goals or resolutions, New Year's or otherwise. However, with the influx of more size 12 perle cotton threads for hand embroidery I've been forced to consider some reorganization of my studio space. Last year - or was it even earlier than that?! - I bought two little plastic units with three drawers each in which to store the hand dyed flosses I'd been buying at the time. I stopped delivery of the floss when the drawers became too full to close easily and have just lived with the situation since. 

Now that I'm using the perle cottons more frequently (almost exclusively in fact) they are the threads I want to have closer to hand. As much as I'd love to browse the local home improvement and craft stores to see what's available that's out of the question. I looked around online but ended up at Amazon.com again. I bought a pair of plastic boxes that stack and click together, thinking I would use them for the perle cottons. As it turns out, the boxes are a better size for the skeins of floss and the drawers almost perfect for the balls of perle cotton! 

But only two boxes aren't enough for all the floss I have. So now I'm waiting for another delivery, slowed down by the holiday of course. 

One of the other ideas that came to me late last night had to do with my collection of 6" scrappy Barn Door blocks. I worked out a very basic layout for the sole purpose of decreasing their numbers.

I haven't taken the time to actually count them. I seem to remember there were over 200 the last time I did that but I could easily be wrong. (I just counted them. 264, plus or minus two!) That bin they're in is six inches deep. If I can use many of them up I might be able to repurpose that bin for something else! It's going to be musical storage containers around here for a while.

My very simple plan is to sash the blocks for a straightforward grid layout. I did some math last night to determine how much yardage I might need to float the blocks on a single background fabric. I have rummaged through my biggest pieces of fabric and come up with a paisley that was given to me specifically to be used in donation quilts.


The sashes will only be 1.5" finished so I think this tight print will work. It feels good to be enthusiastic about a quilt project again. Progress may be slow in the beginning but at least I've got something in the works. Needlework has been the focus of my efforts of late with the little 12 Pages book and gifts for the grands. I have no intention of setting needlework aside but I'd like to be able to get back to quilt making too. 😏

And while I have your attention, let me wish you and yours a 2021 that is much happier and healthier than the year we've just concluded!  πŸŽ‰πŸŽŠ


Friday, June 15, 2018

Scrap Happy in June

On the 15th of every month Kate and Gun host a blog hop for those trying to use up their scrap fabric (or yarn or other crafting supplies). Anything from pin cushions to quilts are eligible as long as scraps have been used in the making. I appreciate the mini deadline forcing me to think about how to use more of my scraps - especially since I've temporarily dropped out of the weekly Rainbow Scrap Challenge.

I routinely use scrap patches to build 6" Shoo-fly or Hole in the Barn Door blocks. I cut the pieces ahead of time and then sew them together between the seams of other projects (i.e. leaders and enders). I make the occasional postage stamp star too. But for Scrap Happy Day this month I returned to my 15" Truly Scrappy Scrappy Trip blocks.


An interesting thing happened on the way to this Scrap Happy Day. I didn't have the variety of prints I wanted for my blocks so I went through several piles of scraps to see what qualified. It was a bit disconcerting to discover how many places scraps have ended up in. When I finished cutting the 3" x 19" strips I needed for these Scrappy Trip blocks the cutting mojo was still strong. I'd also had an idea for using my narrowest scrap strips (1.5").  With that idea in mind I started trimming my narrow strips to specific lengths, something I've avoided doing in the past. I emptied the box they were stored in and went on to another box of larger scraps. I all but emptied that one too! There were more squares and triangles than strips from that second box.

During this cutting marathon I remembered a plastic storage unit I'd bought online a few months ago. It didn't turn out to be useful for the purpose I'd intended. But look how well it corrals my 1.5" strips!


I have 2.5" lengths and 3.5," and 4.5." At the bottom of the picture are 6.5" strips. These three trays stack and clip together. That will make it easy to move them to and from the sewing machine for mindless sewing. The box the strips were originally stored in has been repurposed  for the 6.5" strips. I've been able to fit in a few 2.5" wide strips as well.


There were more 1.5" squares created while all this was going on. They've now outgrown the little gift box I'd been storing them in. Apparently it's time to make more postage stamp stars!


To see more scrappy goodness you can visit the bloggers listed below. They may not participate every month but you won't be sorry you stopped by. 😊

Thursday, January 19, 2017

Confession Time

I've had a skeleton in my closet.


Behind that skeleton is a set of shelves loaded with yardage, not all of it quilting cottons.

And this is what poor Ruby Blue has been laboring under for months:
Ruby Blue is my second machine.
She's great for zipping up long
straight seams and applying bindings.
Stacks of blocks that are technically part of my Parts Department. That's not the only stack in the studio either.

My local quilt guild holds an auction every year in January. The monies raised are used to fund our charitable activities. I've pretty well cleared out the books I could bear to part with. I've never been one to collect patterns or rulers or other gadgets. The one thing I have too much of (if that's even possible!) is fabric. The logical conclusion was to take advantage of the auction and share my wealth.

To that end I have cleared out 99.9% of my flannels. Of all the fabric in my stash I figured they were the least likely to be used in the near future. Most of them were infant or juvenile prints anyway, and there are gals in the guild who focus on making preemie quilts. My focus needs to be on utilizing what's in my Parts Department.

Empty shelf!

Look how well the pizza boxes I use for block storage fit on that empty shelf:


And now Ruby Blue is free of her heavy burden. I can use her more easily and more often to make more blocks and bind more quilts. ;- )

No doubt there's further organizing that could take place here in The Magpie's Nest. For the time being however, I need to return to activities that are more fun. In particular I'm hearing the siren call of tropical batiks...

Monday, January 13, 2014

An Ending and A Potential Beginning

This is the reason I didn't commit to full participation in Scrappy Saturdays: I cut patches from scraps in the days leading up to Saturday and then Saturday I ended up finishing the binding on the latest set of placemats for my daughter instead of sewing scraps!

Here are the placemats:


Everything from peppermints and candy canes to Valentine's Day hearts and ribbons. :- )  I used the sewing machine to apply and sew down the bindings. On the very first placemat I forgot to work from the back to the front (the one right above) which, of course, was the one placemat with decidedly red or white strips at the perimeters. No matter what color thread I used it was going to show. Oh well. Finished is better than perfect. That was the mantra that got me through to the end of this project.

Leading up to Scrappy Saturday I cut patches and strips from some of the remnants laying around. These two stacks represent patches for 25 six inch blocks:


I've been using binder clips to keep my strips organized. The strips had outgrown the number of clips I had available however. A trip to Office Depot remedied that, although not without consequences to my well being.

I now have each strip width designated by a different color binder clip. The strips are also sorted by length, and in some cases also by value. There are so many 2.5" strips I ended up using two values of clips as well, light and dark blue! (The lighter clips hold shorter strips.)


I have several ideas percolating to get these strips used up. In the meantime, while I was recovering from my shopping trip I sewed up many of those scrap-patch blocks:


This morning I had an idea for incorporating these Amish style blocks into a top for Debra Spinic's new Smokin' Hot Quilt Challenge. We'll have to wait and see how that idea pans out... ;- )

Thursday, December 15, 2011

I'm Still Here

I've been feeling better for a few days now but have been using that time to make a few Christmas gifts and get them ready for shipping. I would show you what I've made but I don't want to take a chance on spoiling what little surprise there will be. ;- ) And I know I forgot to take pictures of a couple of the items. My bad.

I do have something to share though. For a couple of years now I've been using a form I developed to keep track of the various projects I was either working on or wanted to work on. The day came, however, when I wanted something more visual to keep me motivated. I sketched out some ideas in my studio journal:


I went to our local Office Depot to see what they might have that I could use or adapt. I'd looked at project boards and flow charts online. There are white boards and such that could have worked were they not so expensive and so stinky. I was beginning to think I would have to shelve this project when I found packages of cork strips. I bought them in the hope that I'd be able to find something at home on which to mount them. Turns out I had the perfect thing!

This is a piece of bead board my husband had turned into an easel for displaying the fairy dolls I used to make and sell. I took off the easel part, removed the protruding screws, and stuck the cork strips down with the adhesive tape that came in the packages. It's about 12 inches by 15 inches.

I also found these at Office Depot:

How could I not buy them?!

So now I have this hanging on the wall over my desk in the studio:

Working from left to right, the first column is for projects I want to make or have committed to making but I haven't quite figured out what I'm going to do yet. The second column is for projects I've begun, the third for Works in Progress (I'm well into them but they're not close to being done yet). The fourth column is currently labeled "Flimsy," meaning the top is complete and I have to make a back. The fifth column is for quilts that need binding. The last column on the right is where I'm pinning the projects that have made their way all across the board and are DONE! I'm using the two horizontal strips across the bottom to pin up ideas for future projects.

So far this system is working pretty well. I think I'm going to need to fine tune the "Flimsy" and "Binding" columns but I haven't quite figured out what I want to do yet. The DONE! column is filling up in a satisfying way. The child in me enjoys marching the squares across the board as the projects progress from one stage to the next. I can easily arrange and rearrange priorities too. I've pinned up my Ben&Jerry's bumper sticker right below the board to remind myself "If it's not fun why do it?"

Sunday, December 5, 2010

It's Starting to Look Like Christmas

We've had a relatively dry week. Yesterday we even had real sunshine, as opposed to the glare of sun through a thin layer of clouds. We took the opportunity to drive up to one of the verdant forests of trees in the area to pick out our tree for Christmas this year.

We usually have a Douglas Fir. For a change of pace this year we chose a spruce. Here's our personal lumberjack hauling it out of the forest for us:

Now all we have to do is dig out the Christmas decorations and get busy!

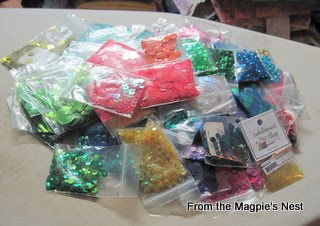
This past week I also made one last foray into the local sewing supply store that is closing. The owner is retiring for health reasons. That business is going to be sorely missed. I brought home a pile of sequins, a couple tubes of beads, half a dozen fat quarters, and some funky yarns. The sequins posed a storage problem.

Up until now I've just kept them, for the most part, in the same drawers I use for storing my beads. More than one of my bead drawers had become hard to open and close however. I made the decision to remove the sequins and see what kind of difference that would make.

It made a world of difference. Suddenly drawers that were all but overflowing now have all kinds of room for new beads! But where to put the sequins?

I had this cute animal crackers tin laying around, waiting to be used.

Not quite big enough. Hmm... what else?

Maybe if I dump these scraps out of this plastic shoebox... Ah, they all fit, with room for more. Perfect!

So far I've resisted the urge to sort them according to color. It might be more stimulating to have them all jumbled together.

Another perk is that this activity has sent me back to my Bead Journal Project ornaments. I was behind by about 5 ornaments when I brought those new sequins home. I'm happy to report that I am now almost up to date. Two ornaments have been embellished and are ready for backing and hanging loops, one is in the process of being embellished. Maybe I've miscounted - I'll have to go look. Near as I can figure though, I should only have December left to create to complete the collection for the year. Woohoo!

I wasn't sure I was going to sign up to participate in the BJP for 2011 because I had fallen so far behind this year. After spending some time catching up with other BJP bloggers I realized it's not the finishing of the individual ornaments that is the main thing. It's what you learn about yourself along the way that is the most valuable. And I've learned a lot. So I signed up again. If any of my readers are even remotely thinking about participating in the BJP for 2011 I would encourage you to do so and to hurry up! and register because registration closes this Wednesday, December 8.

Wednesday, September 1, 2010

While We're Waiting

My little Priority Quilt inspired by the Transitions challenge is bound and waiting for its' registration number from the AAQI. Before I send it off I will show you how it turned out. In the meantime, I've been reading this lately:

I have learned so much about my husband from this book! Obviously I bought it with myself in mind but holy cow! it explains so much about what's happened in the garage (and every other room my husband takes over for any amount of time). I would love for my husband to read the book himself because he and the author are two of a kind in many ways and he would find it uplifting. I may have to settle for trying to work in as much of the advice as I can from the sidelines as it were, because DH is pretty overwhelmed by his job these days. I'm getting some good ideas for myself though. It may not be evident here on the blog but hopefully it will make a difference in the rest of my life. (I have a terrible time making appointments. Once they're made I'm okay, but I put off making the phone call until it's nearly too late.)

I haven't sewn since I finished the Priority Quilt but I am thinking about what to tackle next. I still have two and a half ornaments to make for the Bead Journal Project: May is about half done, I need to do one for June and now August as well. Guess I'm just not that interested in hand sewing at the moment.

I have 76 six inch liberated log cabin blocks that I've made as a result of random 15 Minutes of Play.

I don't know why I'm so anxious to use them up somehow, but I am. This morning the thought came to me that I could sew the blocks up into a medallion of whatever size and then border the medallion with strips of leftover fabrics, log cabin style again, until I had a top big enough to cover someone. I've always wanted to try the "single giant log cabin block" kind of quilt.

See this? This is what my mother referred to as a pie basket. I believe she was given this one as a wedding present. That would have been in 1953.

It had two trays that sat on top of one another and would hold a pie each. I've used it to transport cupcakes and cakes but I've never been a big pie maker. That's my sister. I sew and bake cookies and cakes, she knits and bakes pies.

Anywho, before I even read the book at the top of this post I took the trays out of the basket and brought it into the studio for storing those larger pieces of leftover fabric. It's been very helpful to be able to grab the basket when I needed something bigger to cut patches or strips from and to have a place to just toss prints that were nearly gone but not quite.

This is where I'd like to pull those bigger strips from for my giant log cabin quilt block. At least to begin with. I'll probably have to resort to my stash of older prints eventually. Or improvise in another way. ;- )