Showing posts with label fabric book. Show all posts

Friday, February 28, 2025

Just Ducky

 I shared a bit of this at the end of January of this year. Now it's time to show you the completed book. Or as complete as it's going to be for now; there could be further embellishments in the future, you never know!

 This began with another child's handkerchief, folded in half to create the outer cover. I put a piece of quilt batting between the two layers of the hanky to stabilize it and give it a bit of substance. It's amazing how thin many of the vintage hankies are.  

I quilted around the Sailor Duck and eventually around the border print as well. The dragonfly was created commercially from felt.

The body of the duck hanky was plain so I added the corner from a lady's hanky and the seashell to fill up the blank space inside the front cover. Next to is is the lacy border from some yardage.

Flipping over the lace you find a duck print I've had for years in my quilting stash. To dress it up a bit I added the laces and rick rack.

This is what you see when you turn over the duck print page. The base of the page is fabric from an old handmade apron. I added the bit with the bird from another quilter's cotton and a piece of a woven ribbon to decorate that page. The lace on the facing page is blanket stitched to a piece of wool felt. I do like a variegated thread. 😁

 Turning over the lace...

You have the felt (for needles and pins if you like) and opposite, a side-opening pocket made from vintage cloth with more lace and a ribbon across the top. The vintage laundry tag serves as a tag on the pocket's edge. The little yellow bird is printed on the flannel that makes the base for this page. I added the little bit of feather stitching. 

Turning over that pocket-page you come to the center spread of the book. Somewhere I had acquired this strip of lace that had already been hemmed on one edge. By stitching up the sides and across the bottom I was able to turn it into pockets large enough to store packets of needles. Again, I added the strip of lace across the top (which creates just enough of a flap to help hold the needle tubes in place). I also stitched through the lace to divide the width into four narrower pockets. The fabric underneath the lace pockets is vintage feed sack.

On the other side of the center spread we have the flannel printed with another cutie pie duckling. I added some simple straight stitches to enhance the image. Just for kicks I sewed a scrap strip of the vintage cloth to the top of the page so it hangs loose. It echoes the green of the wool felt opposite (more storage for needles or pins). 

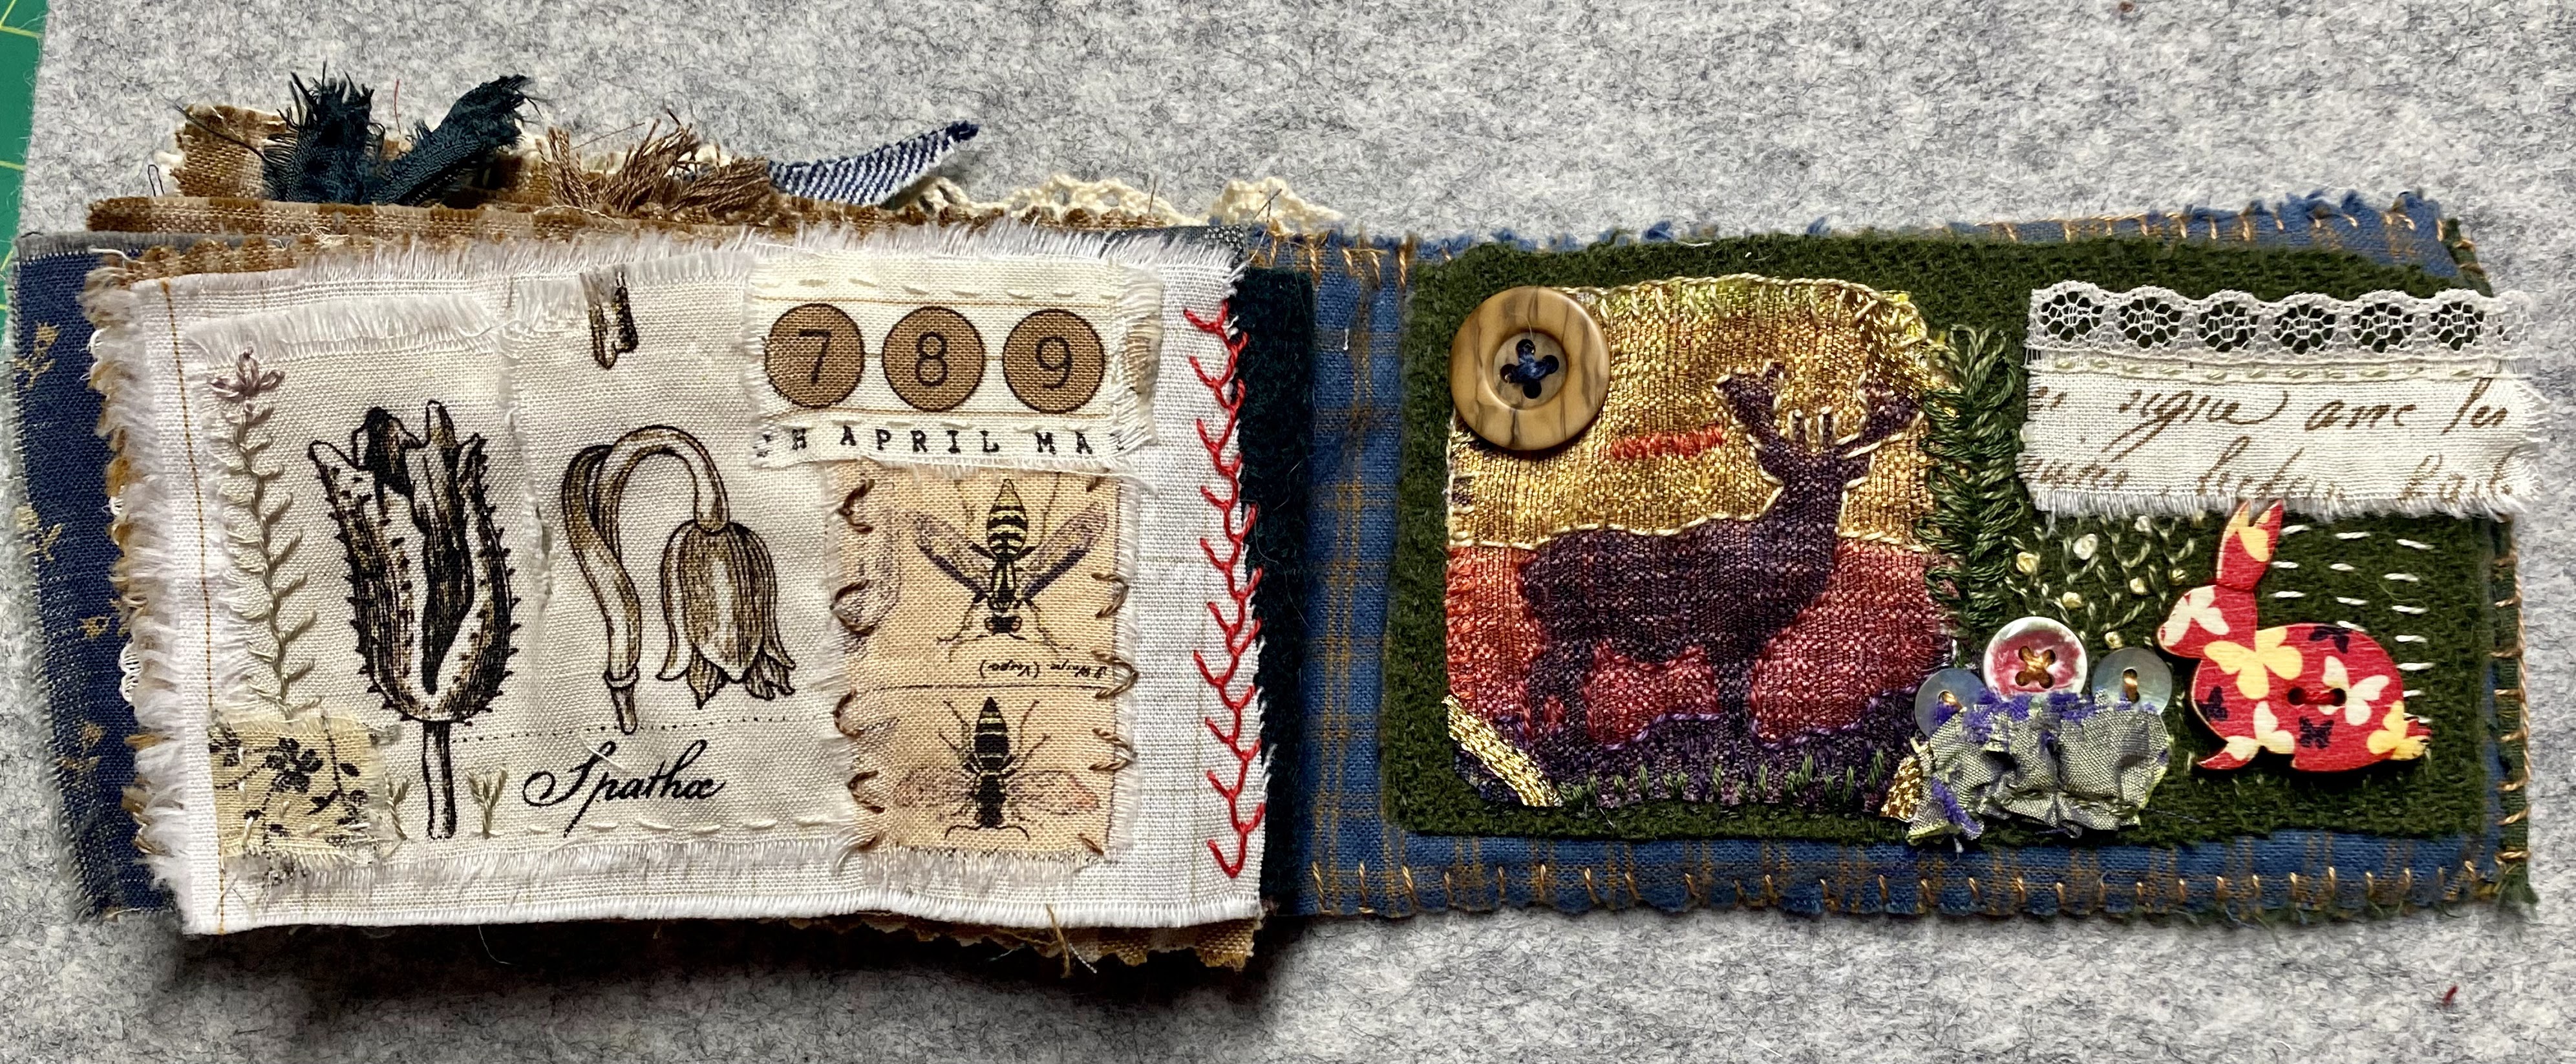
Lace over felt again (the other half of what you encountered at the beginning of the book), and the page I shared in process at the end of January. Purely for fun and decoration. 😊

Turning that over...


 The other half of the ducky print overlaid with another piece from the quilter's cotton embellished with embroidery stitches and a plastic rhinestone dragonfly. And the other half of the wide lace.


 Here you see the inside of the back cover. Another corner from a lady's hanky. I added the feather stitched foliage between the rosebuds and the metal charm and pink butterfly button. I've had that button forever! I was pleased to find a place for it finally.

To fill in the blank space on the back cover I simply stitched on a bit of fussy-cut lace. I like that some of the laces and edges peek out of the top and bottom of the book. This feels really lovely in the hand. Soft and squishy (except for the tubes of needles in the middle!). It measures about four inches tall and 4.5" wide. The handmade apron I used for a page base had ties made from a narrow green bias binding. I'm using a strip of that to tie the book closed although I haven't attached it to the book in any way. 

So there you have it. This was a fun project. I especially like finding ways to utilize the vintage linens that would otherwise sit in a pile or a drawer and rarely be seen. The engineering involved in the construction of pages and pockets and such is still new to me. I'm definitely learning as I go. I've already begun the next fabric book (and had to undo half of what I'd done too soon in the process). There's no telling when you'll see how it turns out. Hopefully, we'll all live long enough to see that day!


Saturday, February 15, 2025

Scrap Happy in February - Not Quilt Blocks!

Scrap Happy Day is an opportunity for us to share things we've made from scrap materials or how we have repurposed something. This month my shares fall into the latter category, although scrap materials have also been involved. 

In my last post I showed some of the latest needle book I'd been working on. That has since been completed. To avoid over loading this post with pictures I will share it separately, in a post of its' own. But let me show you the other needle books I've made in recent weeks. 

This is the simplest one. I used a piece of denim from the leg of my husband's cast-off jeans for the base of the cover, then embellished it with the embroidered portion of a vintage handkerchief and a bit of embroidery of my own.

Three are no pages in this book. (Does that mean it doesn't qualify as a book? Is it merely a pamphlet?) Instead the inside of the cover has a pocket for a pair of scissors, made from more of the denim, and some felt for storing needles and pins. The yellow foundation is cotton from another vintage hanky.

On the back of the book I simply stitched on a vintage crochet piece rescued from somewhere.

This is the book I use almost daily. It's about 3.5" wide (closed) and 5" high. 

Another little book I've made began with a vintage child's hanky. It's about four inches square.

This little housekeeper is the main image printed on the hanky. Isn't she cute? I stitched around her and then seed stitched the rest of the background area with tiny upright cross stitches. And added the sequin bluebird!

There are two layers of the felted red wool inside the front cover, with a bit of lace to distinguish between the two layers. Wool is my preference for storing needles and pins. I understand it helps to keep them sharp and keeps them from rusting. The pair of Westies came from a vintage guest towel and are layered over a bit of fabric from an old hand made apron. I only sewed down three sides of the towel fabric so they make a pocket.

The center spread was created from a strip of pillowcase that had the crochet edging you see at the bottom of the page. The fabric of the pillowcase lines the apron fabric from the previous page. Then I layered strips of vintage laces on a piece of muslin to make the pocket front. Sewing the pages in place, up the middle of this signature, created two pockets in the middle of this book.

Turning the page you find the apron fabric again with another bit of crochet and a bead stitched on top and two more pages of felted wool. 

Here you can see the flower pot that is printed on the other three corners of the hanky and the laundry tag I sewed on just for the heck of it. (One of my great-grandmothers was called Eva. As I understand it, all of my grandmothers sewed or crafted. This laundry tag is my way of honoring them, bringing them into my projects with me.)
 

On the back cover I stitched around that flower pot and raw edge appliqued some favorite images from my quilting cottons, then filled in with more upright crosses. 

Here's a list of where you can see more scrapilicious projects. If you'd like to participate just leave a comment on Kate's blog. If it weren't for Scrap Happy Days I'd probably stop blogging altogether!

Kate, Eva, Sue, Lynda,
Birthe, Turid, Tracy, Jan,
Moira, Sandra, Chris, Alys,
Claire, Jean, Dawn, Gwen,
Sunny, Kjerstin, Sue L, Vera,
Ann, Dawn 2, Carol, Preeti,
Nóilin, Viv, Karrin, Alissa,
Tierney, Hannah and Maggie


Thursday, January 30, 2025

Warpping Up (in) January

 Our corner of the world has had a very mild winter up until this week. Suddenly we are experiencing below freezing temperatures overnight and well into the morning hours. There's even a chance we'll see a bit of snow in the next couple of days. I'm actually glad to have this change in the weather as it feels more appropriate to the season than what we've had until now. Still, winter has never been my favorite time of the year. 

The prompt for Tori's (KoolKookyKreatures on YouTube) postcard sew-along this January was "Snow Day!" I wasn't excited by this prompt - as you may have guessed. But I found some crazy patchwork I'd done all in white several years ago. That made for a great base.

I'd picked up that large applique somewhere along the way and it put me in mind of wind blowing. I used some bits of lace to create mounds of snow and a mini pom-pom trim along the top and bottom edges. A few snowflake sequins and a charm, some tiny white cross stitches scattered in the background, and I was done! I was pleased at how quickly it all came together once I got started. The prompt for February is "Feathered Friends." So far I don't have a clue how I will approach that one. Plenty of ideas, of course, but nothing in the planning stage yet.

The other project I've been working on this month is a little fabric book I'm calling "Just Ducky." It began with a vintage child's handkerchief. I folded it in half with a scrap of quilt batting between the layers to create the cover.

Inside I'm layering other fabrics and laces to create the pages. This is the third or fourth such book I've made so far. They began as needle books but are gradually evolving. This one will have a few pockets in it and a wool page that could be used for storing needles and pins but is less utilitarian than previous versions. (Come to think of it, I don't think I've shared previous versions with you. I'll have to make sure to do that soon.)

This is one of the embellished pages in "Just Ducky." And below is another.

When it is finished I'll share every page. I'm enjoying the challenge of working with vintage hankies. This is also giving me a place to use the charms and beads and laces I've collected over the years. It's about time I started using more of the treasures that have come into The Magpie's Nest! 


Monday, July 1, 2024

Huswif Book of Treasures

 Historically a huswif - or hussif or housewife - would take the form of a long narrow rectangle that could be rolled up and secured with a tie or button closure. It was essentially a portable sewing kit. There would be one or more pockets, a place for needles and pins and scissors to be stored, and possibly a pin cushion. During WWI soldiers were required to have one in their pack to keep their uniforms in good repair. 

A more familiar item might be a needle book. I've recently been inspired by a fairly new YouTube creator, Bec at sewbecurated. She has expanded the concept of a needle book to include vintage textiles as a place to store or preserve them. I have combined the utility of a huswif with Bec's approach to needle books in my version of a huswif. 

This is the cover of my book. I've stitched on a few of my favorite mother of pearl buttons, strips of vintage lace, and a square of needlepoint I stitched in the 1970's. I've used a hand dyed seam binding to tie the book closed.

I think the crochet trim I've used at the bottom of my huswif probably came off a pillowcase.

This is the back of my book. More laces, vintage buttons and a corner from a handkerchief. I've seed stitched the covers with tiny cross stitches in a variegated perle cotton (size 12).

The inside front cover has a pocket and a stamped image. I was very purposeful about using things I've been collecting for the last year or more. The stamped image and the rose fabric both came from Tilly at Tilly Rose Vintage in the UK.

Next is a sheer little doily.

Under that is a page made from fabric I pulled out of my mother's rag bag as a newly married woman.

The little square of white with the rosebud and butterfly is a feed sack scrap. 

Next is another purchase from Tilly. I've trimmed the linen panel with more strips of vintage trims I've collected. The panel is a reproduction of a French label. It felt too fragile to make into a pocket so it's stitched down on all four sides.

Under the wide lace is this denim page embellished with a couple of vintage appliques and another bit of crochet. The heart was cut from a quilt by Lauretta at Sparrowhawker Designs.

Turning the page you come to the utility spread of my huswif. 

On the left side are two pieces of felted wool for needles. Below that is more wool, lightly stuffed to be a pin cushion. On the right I put a doily from my grandmother's household over the pink felt that backs the denim. On top of the doily I have the triangular pocket for my embroidery scissors. They have to be tied in place or they will fall out if I transport the book anywhere. 

Next is a stamped image from Pamela the Hippie Gypsy and a collar piece I bought from one of Dawn Stephan's sales.


Flipping over the lace reveals the bottom of a vintage appliqued tea towel. Just so pretty!

This is the inside of the back cover. At the bottom is another small pocket. It started out as a corner from an embroidered linen Rachel Roxburgh included in a packet I purchased from her. I've added the eyelet down one side and more vintage lace across the top. At the top of the page I stitched on a piece of crocheted doily. 

Opposite the inside back cover we have Jack Skellington.


He's been hanging on my bulletin board for I don't know how many years. I was thrilled to discover that he would fit perfectly in my huswif. I added a braid down the left edge - this screen print was done on something that ravels fairly easily. The best part is that I was able to make him into a pocket that opens on that side with the braid.

While this was a slow growing project it has been a lot of fun. I'm already thinking about making something similar. This one has turned out to be a bit too large for me to use daily. Most of my tools are on my work table right at hand anyway. The idea of showcasing treasured textiles in book form really appeals to me. Maybe this will be a way for me to pass bits of family history treasures down to our children and grandchildren. 😊


Sunday, September 10, 2023

Just Because in Denim

I've debated whether to save this for Scrap Happy Day - which is right around the corner - but wanted to share before I forget to do it at all. 

Suddenly we've had a rash of worn out blue jeans. We are not of the generation who thinks it's a fashion statement to go out in public in ripped jeans. However, there's still a lot of good denim remaining. And I have come to love a frayed edge. So I ripped some strips off one leg of a pair of jeans, starting at the rip that was already there. I kept the strips at a width I find comfortable to hold in my hands for slow stitching/embroidery. (Really, the term slow stitching pretty well covers what I tend to do with thread and embellishments on fabric. I'm not one for the complex embroidery stitches or fine technique anymore. I prefer simple, straightforward stitches and adding charms and beads and things to complete whatever picture or story I'm trying to convey. The Perfectionist dwelling within can just go sit in the back of the room and keep quiet.) This is what I ended up with. You can see the hem from the bottom of the pant leg on this cover of my denim book.

The first page I chose to decorate is actually the last page of the book. I watched videos from Emma Freeman on YouTube in which she shared her use of seed stitches to create patterns that give the impression of text. I was really taken with that and wanted to have a go myself. This was the place to do it. I used some cotton crochet thread I'd picked up secondhand. Next time I will use a stouter thread if I do more on denim.

I also added a strip of vintage lace and an old button I believe is Mother of Pearl (MOP). So this page definitely qualifies for Scrap Happy Day! 

I've been buying pieces of crochet as well as laces lately. Someone else has sourced the original work and cut it up specifically for those of us who enjoy using these salvaged bits in our art work. One such piece was a perfect fit on the cover of my book.

I may end up doing some further embellishment of the cover but for now I'm content to showcase this lovely piece of crochet (a skill I haven't been able to master). 

One of my recent acquisitions was a wide strip of vintage lace. A small section of that made for a little pocket on another page of my book.

Then I felt compelled to make a little journal to go into the pocket. I used a discarded library return card for the cover and some scraps of various papers for the signature inside. I chose to use a small piece of a handmade paper (again, someone else's cast-off) to alter the front cover of the little book. I've finally found a paste I can use in place of the glues my body finds so toxic.

The sunflowers are a vellum sticker.


One of the pages in my denim book came from the original hole in the jeans. That edge created a natural thumb notch for a pocket. I stitched along that edge to help strengthen the fibers. There was further weakness in that section of denim so I did some weaving with floss over that area, then added a couple of tiny buttons for visual interest. It looks like a large flower pot or urn to me.

By the time this page was finished I had created a flower bed complete with visiting snail!

I sewed this page to the one behind it (which is the first page I showed you) to turn them into a larger pocket. I'm not sure yet what may end up living in that pocket. For the purposes of demonstration I have slipped a piece of paper into the pocket in the photo below.


There will eventually be four pages between the covers of this book. I have one and a half finished at this point. I love the way this feels in my hands. It's so soft and tactile. I want to continue to use little treasures I've acquired along the way, things that are special to me. It's time - past time! - for these little things to be given a home where they can be enjoyed and not merely stored away out of sight. 😊


Saturday, August 6, 2022

#JustBecause Book

How has it been a whole week since my last post?! Time really does fly when you're having fun. Or at least when you're engrossed in a good book. 😉

 I've been working a bit at a time on a fabric book for some time now. During the last week it became a finished product. I began with some rough cut pieces of yarn-dyed plaids I won in one of the Disabled Artists Foundation auctions. About the same time I was learning about art journals from YouTube videos. I also came across Susan Taylor Brown's videos and began tuning in to her live streams. She encourages us to make art "just because." This sounded like an ideal antidote for my perfectionist tendencies. I decided to have a go at turning those pieces of cotton fabric into pages and a cover for a book. Most significantly, I was determined to do it without straightening any edges or making everything the same size and shape!

I began with some slow stitching on single pieces of the fabric bundle. 


I played around with layers of textiles. I created a couple of pockets, and then made a pair of tiny tags to live in them.

Even a feather from one of my canaries got stitched down!

 There are beads and buttons strewn throughout.

A lot of the laces also came from dAFi (Disabled Artists Foundation, Inc.) auctions.

 But of course there are treasures from my own hoard included, like labels from men's neckties and quilter's cotton prints.

 
 Assembling the pages into signatures and then assembling the book as a whole was the scariest part. I hadn't thought out the process in the beginning and that complicated matters a bit. I'm happy with the end results though. 😊

The front cover.


The back of the book.


And that's the end of the story!