Sunday, April 13, 2025
Celebrating Spring
Thursday, April 10, 2025
Coming Up for Air
Jinxxxygirl (Deb) has pointed out to me that it's been a while since my last post. She's right! I hadn't realized so much time has passed. I've been head-down in the scrap pile all this time. Well, except for the times I've been down with a headache or what have you.
I developed a menu of sorts for attacking the larger scraps in the stash. I begin by cutting a 7.25" square that I cut diagonally twice for flying geese. If that print is also appropriate for backgrounds in the flying geese units I'll cut 3.875" half-square triangles. (I still use the methods I learned at the beginning of my quilting career.) That takes up about 16" of length. Then I cut two 5.25" squares for the 4" (finished) Hourglass units that become 8" Hourglass/Big Dipper blocks. Next I cut pieces for the Janet Kime cat blocks. On occasion I've been able to cut background pieces for 8" variable Star blocks or a 4.5" patch for the center of a star. To polish off the fabric I'll cut 2.875" HSTs and 2.5" squares or rectangles for 6" Shoo-fly or Hole in the Barn Door blocks and 2" wide bits for Lego blocks. All of these patches get set aside until there are enough to begin pairing up backgrounds and foregrounds.
 |
I should now have 46 of the Hourglass/Big Dipper blocks. I'm shooting for 63 for the quilt plan I have in mind.
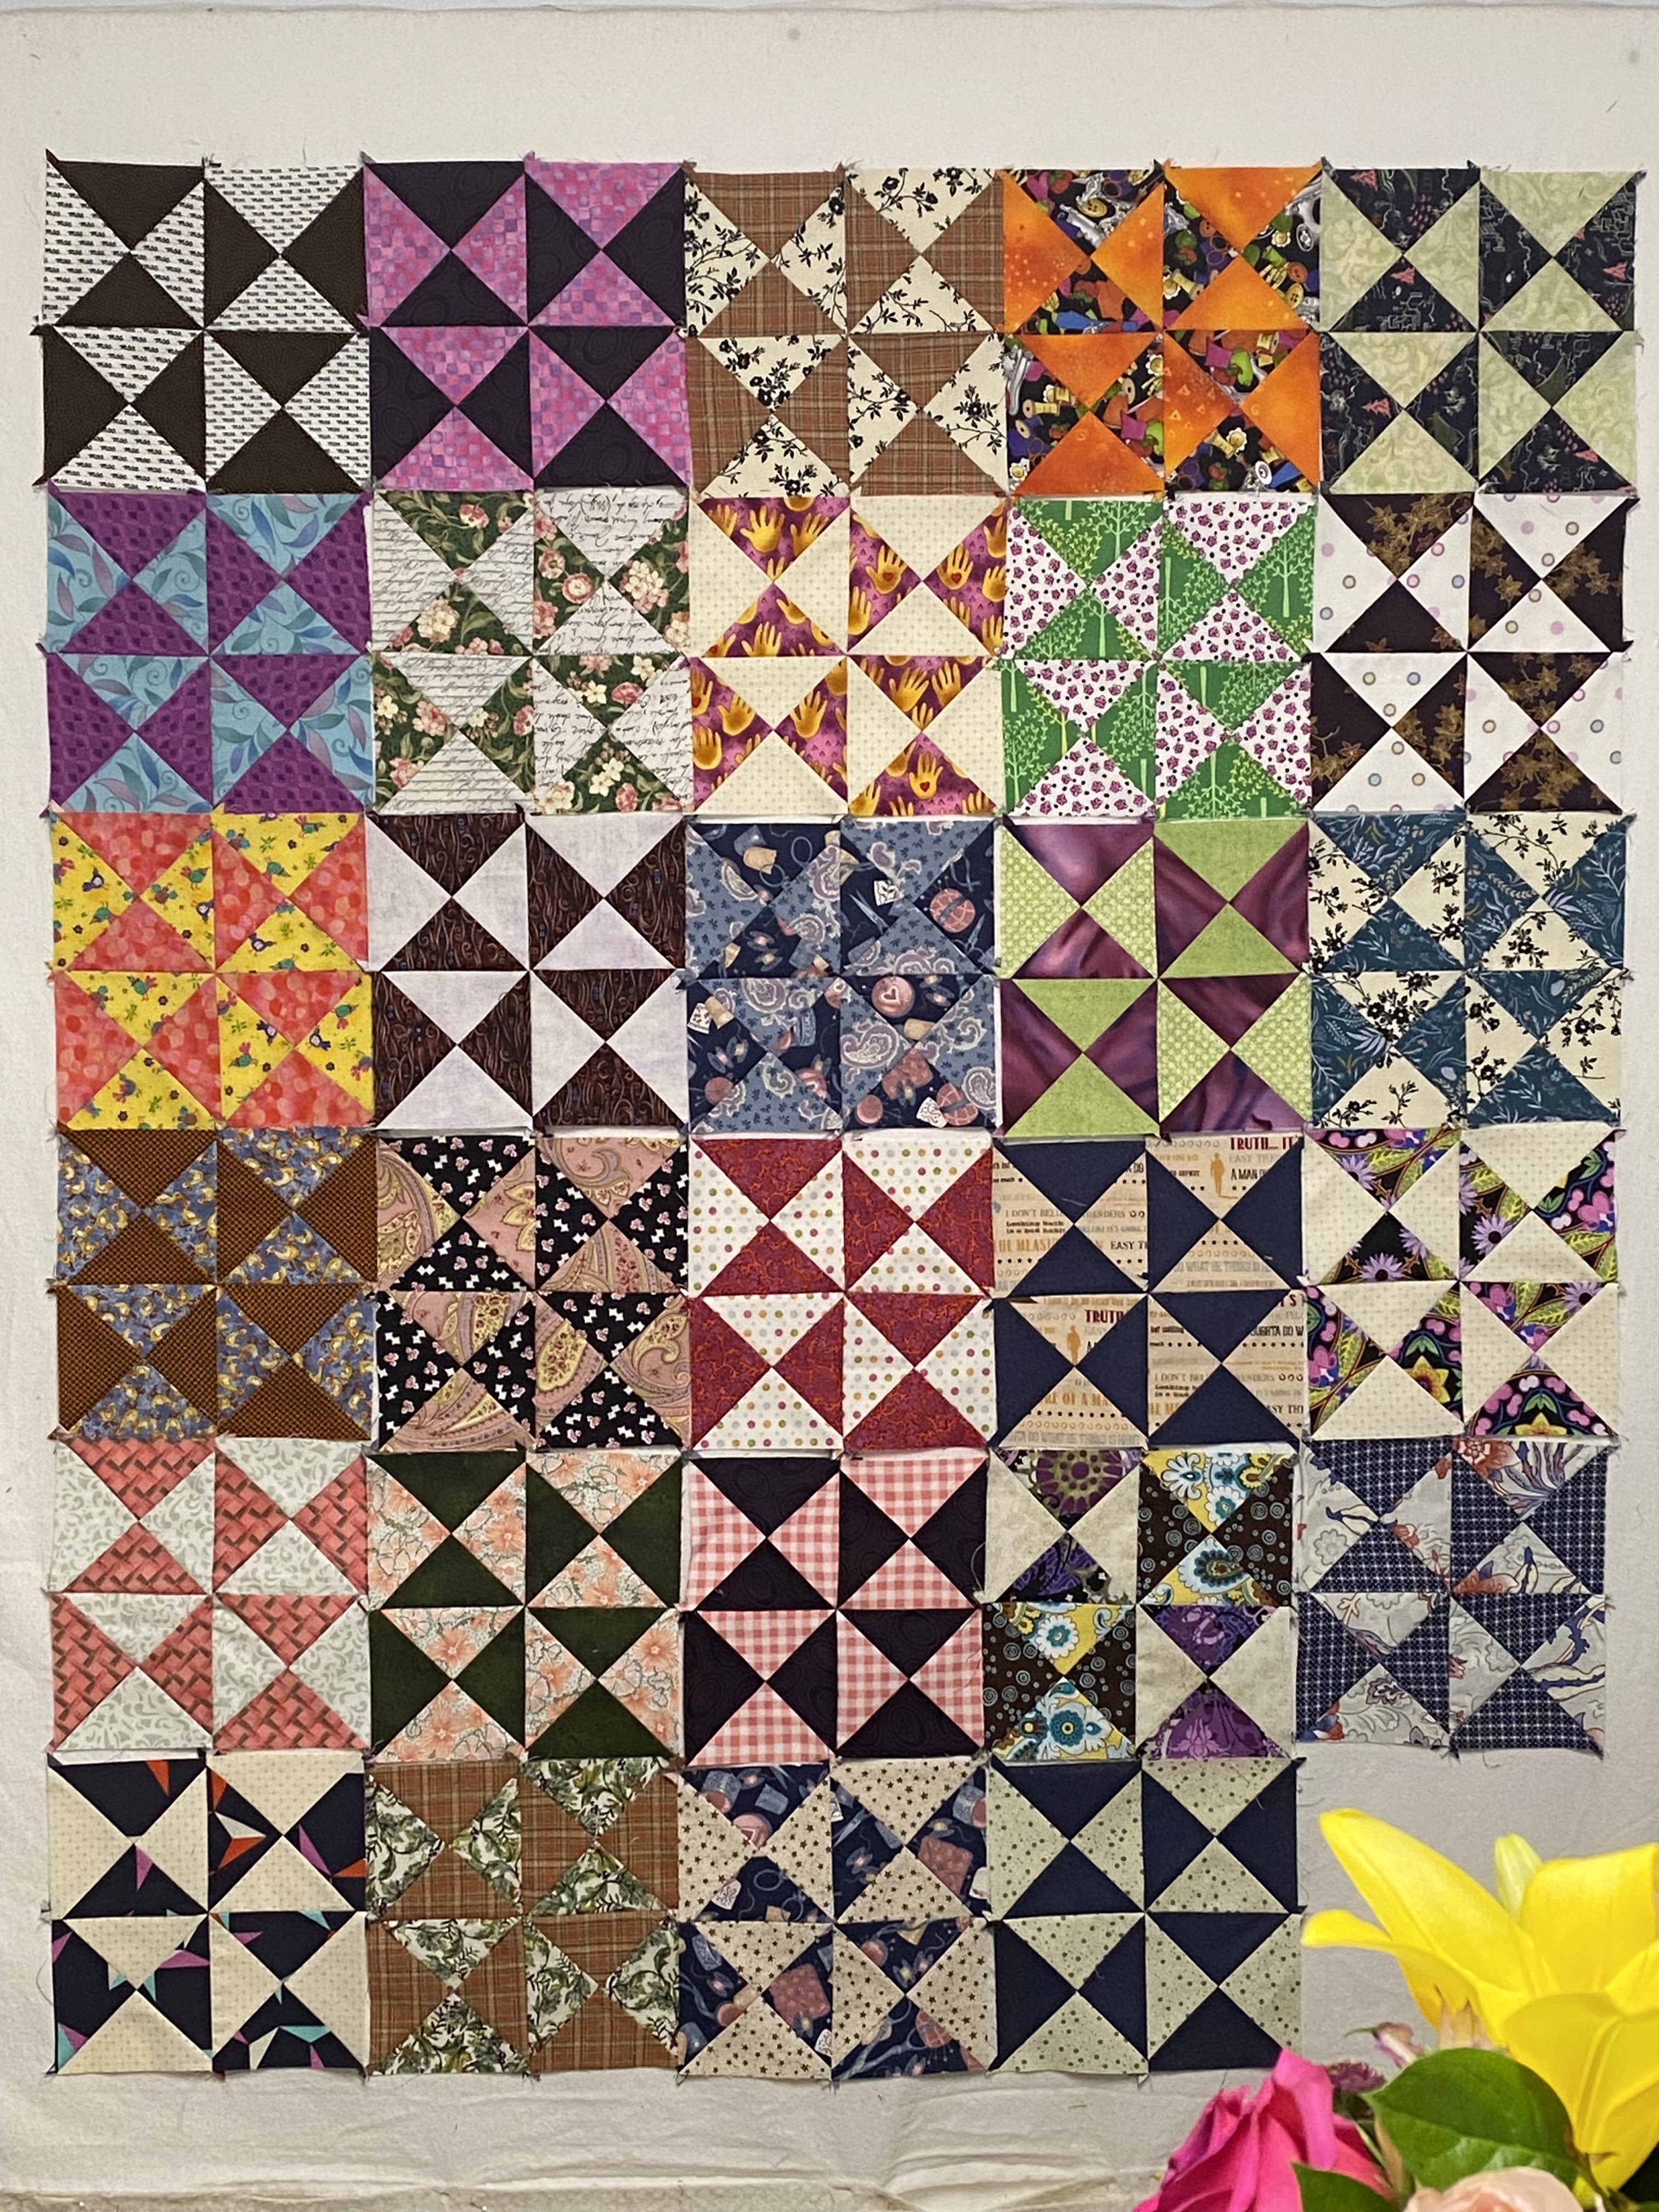
More than that will allow for some to be eliminated from the final layout. And, of course, the plan may change at any moment!
I have no idea how many stars there are in various bags and boxes in the Parts Department. The postage stamp stars are separate from the whole cloth center stars, and I even have a separate bag that holds the stars on white-on-white backgrounds. Sometimes organizing can be carried a step too far. 😉
The pile of patches for cats is a bit intimidating. I've cut background patches, but not nearly enough for all of the cats. There's probably a whole other quilt in that pile.
Scrap Happy Day is just around the corner. What I will have to share on the day?
Saturday, March 15, 2025
A New Addition to the Parts Department - Scrap Happy in March
Now that I've lightened the load in my Parts Department I have turned my attention to using up more of the leftovers and remnants hanging around. I began with flying geese. This seems to be my Flying Geese Period. 😉 If you remember, recently every scrap block was a variable star!
 |
| 3" x 6" geese |
Anyway, I found myself needing another block to use up certain size scraps. I landed on one called Big Dipper.

I can't figure out why or how it came to be called that. I don't see a connection at all. If anyone knows of an alternate name please let me know! I may just refer to them as Hourglass blocks since they are made up of four hourglass units. The ones I'm making will finish at eight inches square.

This is what I have so far. At the moment I'm thinking I will just keep making these until I have enough for a whole quilt top. I don't think they will play nicely with other blocks unless I use sashing between them. I prefer to just run my blocks together as often as I can get away with it.
Meanwhile, the geese continue to accumulate too. My smaller scraps get cut for 6" Shoo-fly or Hole in the Barn Door blocks and Lego blocks. The scrappy quilts I make go to local kids in foster care or are sent to Wrap the World With Quilts for distribution elsewhere.
Scrap Happy Day is an opportunity to share projects that have been made out of scrap materials or something you've repurposed somehow. We post on the15th of each month. Kate is the organizer of this blog hop; you'll find her at the top of the link list below. Leave a comment on her blog if you'd like to participate in the future.
Kate, Eva, Lynda,
Birthe, Turid, Tracy, Jan,
Moira, Sandra, Chris, Alys,
Claire, Jean, Dawn, Gwen,
Sunny, Kjerstin, Sue L, Vera,
Ann, Dawn 2, Carol, Preeti,
Viv, Karrin, Alissa,
Hannah and Maggie
Friday, February 28, 2025
Just Ducky
I shared a bit of this at the end of January of this year. Now it's time to show you the completed book. Or as complete as it's going to be for now; there could be further embellishments in the future, you never know!
This began with another child's handkerchief, folded in half to create the outer cover. I put a piece of quilt batting between the two layers of the hanky to stabilize it and give it a bit of substance. It's amazing how thin many of the vintage hankies are.


The body of the duck hanky was plain so I added the corner from a lady's hanky and the seashell to fill up the blank space inside the front cover. Next to is is the lacy border from some yardage.

This is what you see when you turn over the duck print page. The base of the page is fabric from an old handmade apron. I added the bit with the bird from another quilter's cotton and a piece of a woven ribbon to decorate that page. The lace on the facing page is blanket stitched to a piece of wool felt. I do like a variegated thread. 😁

Turning over the lace...


Turning over that pocket-page you come to the center spread of the book. Somewhere I had acquired this strip of lace that had already been hemmed on one edge. By stitching up the sides and across the bottom I was able to turn it into pockets large enough to store packets of needles. Again, I added the strip of lace across the top (which creates just enough of a flap to help hold the needle tubes in place). I also stitched through the lace to divide the width into four narrower pockets. The fabric underneath the lace pockets is vintage feed sack.

On the other side of the center spread we have the flannel printed with another cutie pie duckling. I added some simple straight stitches to enhance the image. Just for kicks I sewed a scrap strip of the vintage cloth to the top of the page so it hangs loose. It echoes the green of the wool felt opposite (more storage for needles or pins).

Lace over felt again (the other half of what you encountered at the beginning of the book), and the page I shared in process at the end of January. Purely for fun and decoration. 😊
Turning that over...

The other half of the ducky print overlaid with another piece from the quilter's cotton embellished with embroidery stitches and a plastic rhinestone dragonfly. And the other half of the wide lace.

Here you see the inside of the back cover. Another corner from a lady's hanky. I added the feather stitched foliage between the rosebuds and the metal charm and pink butterfly button. I've had that button forever! I was pleased to find a place for it finally.

To fill in the blank space on the back cover I simply stitched on a bit of fussy-cut lace. I like that some of the laces and edges peek out of the top and bottom of the book. This feels really lovely in the hand. Soft and squishy (except for the tubes of needles in the middle!). It measures about four inches tall and 4.5" wide. The handmade apron I used for a page base had ties made from a narrow green bias binding. I'm using a strip of that to tie the book closed although I haven't attached it to the book in any way.
So there you have it. This was a fun project. I especially like finding ways to utilize the vintage linens that would otherwise sit in a pile or a drawer and rarely be seen. The engineering involved in the construction of pages and pockets and such is still new to me. I'm definitely learning as I go. I've already begun the next fabric book (and had to undo half of what I'd done too soon in the process). There's no telling when you'll see how it turns out. Hopefully, we'll all live long enough to see that day!
Saturday, February 15, 2025
Scrap Happy in February - Not Quilt Blocks!
Scrap Happy Day is an opportunity for us to share things we've made from scrap materials or how we have repurposed something. This month my shares fall into the latter category, although scrap materials have also been involved.
In my last post I showed some of the latest needle book I'd been working on. That has since been completed. To avoid over loading this post with pictures I will share it separately, in a post of its' own. But let me show you the other needle books I've made in recent weeks.
This is the simplest one. I used a piece of denim from the leg of my husband's cast-off jeans for the base of the cover, then embellished it with the embroidered portion of a vintage handkerchief and a bit of embroidery of my own.

Three are no pages in this book. (Does that mean it doesn't qualify as a book? Is it merely a pamphlet?) Instead the inside of the cover has a pocket for a pair of scissors, made from more of the denim, and some felt for storing needles and pins. The yellow foundation is cotton from another vintage hanky.

On the back of the book I simply stitched on a vintage crochet piece rescued from somewhere.

This is the book I use almost daily. It's about 3.5" wide (closed) and 5" high.
Another little book I've made began with a vintage child's hanky. It's about four inches square.

This little housekeeper is the main image printed on the hanky. Isn't she cute? I stitched around her and then seed stitched the rest of the background area with tiny upright cross stitches. And added the sequin bluebird!

There are two layers of the felted red wool inside the front cover, with a bit of lace to distinguish between the two layers. Wool is my preference for storing needles and pins. I understand it helps to keep them sharp and keeps them from rusting. The pair of Westies came from a vintage guest towel and are layered over a bit of fabric from an old hand made apron. I only sewed down three sides of the towel fabric so they make a pocket.

The center spread was created from a strip of pillowcase that had the crochet edging you see at the bottom of the page. The fabric of the pillowcase lines the apron fabric from the previous page. Then I layered strips of vintage laces on a piece of muslin to make the pocket front. Sewing the pages in place, up the middle of this signature, created two pockets in the middle of this book.

Turning the page you find the apron fabric again with another bit of crochet and a bead stitched on top and two more pages of felted wool.

Here you can see the flower pot that is printed on the other three corners of the hanky and the laundry tag I sewed on just for the heck of it. (One of my great-grandmothers was called Eva. As I understand it, all of my grandmothers sewed or crafted. This laundry tag is my way of honoring them, bringing them into my projects with me.)

On the back cover I stitched around that flower pot and raw edge appliqued some favorite images from my quilting cottons, then filled in with more upright crosses.
Here's a list of where you can see more scrapilicious projects. If you'd like to participate just leave a comment on Kate's blog. If it weren't for Scrap Happy Days I'd probably stop blogging altogether!
Kate, Eva, Sue, Lynda,
Birthe, Turid, Tracy, Jan,
Moira, Sandra, Chris, Alys,
Claire, Jean, Dawn, Gwen,
Sunny, Kjerstin, Sue L, Vera,
Ann, Dawn 2, Carol, Preeti,
Nóilin, Viv, Karrin, Alissa,
Tierney, Hannah and Maggie