Tuesday, February 28, 2012

Light Bulb Moment

Some time ago Julie shared her scraps of text print fabrics with me. I knew I wanted to make a quilt featuring text prints but at the time I had no idea how I would approach it at the time.


There were prints with text scattered throughout my stash. The first thing I did was to pull them all out, to get a feel for what I had.


Of course I began buying additional text prints shortly after Julie's scraps arrived. Before long I had two piles!


The next step was to decide how I would use these prints. This is the most time consuming step for me, apart from actually making the blocks or parts. Just today I learned something about myself and this process.

I think when many folks come to quilt making it's because they want a certain type of quilt for themselves or their home. Maybe they want a Double Wedding Ring for their bed for example. It wasn't the quilt patterns that drew me in, it was the color and patterns in the fabric. I have always loved textiles but I never enjoyed making clothing. Quilt making provided me a venue in which I could play with color and pattern. So I don't buy fabric to make a Log Cabin or any other specific type of quilt. I buy color, I buy the possibilities inherent in a print. Which can make it hard to figure out how best to use all those lovely prints I've acquired!

There are a handful of blocks that are particularly good at showcasing special prints. Those are the blocks I tend to use the most. I've also found a few techniques over the years that I especially enjoy using. One of those is to layer several fabrics on top of each other, make a few cuts, shuffle the pieces, and reassemble them into a new piece of fabric or a block. I first learned of this method back in the early 1990's from one of Eleanor Burns' books. Since then I've seen it in books by Jan Mullen, Gwen Marston, and Karla Alexander. I suspect there are others out there as well, I'm just not aware of them. The point is that it finally dawned on me that these text prints might be a good fit for a version of a quilt Karla Alexander featured on the cover of one of her books:


I have admired that cover quilt for a long time. In fact, it was the reason I bought the book in the first place. Now, I doubt very much that I could ever come close to copying a quilt someone else had already made but Karla's quilt has served to inspire me to use my collection of text prints in a similar way. The last few days have been spent cutting seven inch by ten inch rectangles from the fabrics in my two piles.

Not all of the prints made the cut of course (pun intended). And I may very well have cut enough starter pieces for more than one quilt! That's okay though, I suspect there will be a child's quilt hot on the heels of this one, featuring some of the fun Dr. Seuss prints that are currently available. I also have a red and white quilt trying to coalesce in the mists of my imagination. It's quite possible that there will be a series of string quilts coming out of the Magpie's Nest in the coming months...

Friday, February 24, 2012

An Excursion

I haven't been out to the La Conner Quilt Museum in over a year. It may very well be much longer than that; I lose track of time easily. The building itself has been under renovation for a couple of years now. Between that and the visitors who all bring in their own scents and toxins it's just not a safe place for me to be. I had to go this week though, to see the beaded quilts made by Thom Atkins. It was a painful 24 hours afterward but it was worth it in the long run.

The museum had some of its permanent collection on display on the main floor.


Thom's quilts were on the second floor, and the quilts and wearable art of Susanne Staton are on display on the third floor. All of it is outstanding. I was most surprised by the size of some of the beaded quilts. He has a quilt featuring a toucan that, if I remember correctly, is something like 54" wide and 84" long! I took pictures but most of them are not worth sharing. Here's a detail shot of a centipede crawling up the tree the toucan is sitting in:


And here's another detail shot, but from another quilt:


What I was most curious about was where he finds some of his beads. He has huge glass bead leaves and the bodies of beetles that I've never seen anywhere! The only answer I can come up with on my own is that he lives in California. You can get things there you won't find anywhere else in the country, except maybe New York City. ;- )

In the museum's gift shop I was delighted to find a herd of cloth dolls made by an old friend, Gloria Burke. We used to be in a doll club together - back before my MCS diagnosis put the kibosh on classes and group activities. The dolls were very reasonably priced so I brought one home with me. I was feeling very sorry for myself by that time, unable to even crack open any of the intriguing new books in the gift shop for fear of making myself sicker than I already was at that point. On the way back to my car I took the opportunity to pop into one of the many delectable stores in downtown La Conner. That's where I found the perfect pet for my new doll: a scarlet macaw ornament that was made in Guatemala.

I believe I'm going to name the doll Scarlett. Like me, she obviously loves the color red. The macaw will be Buttons, in honor of a scarlet macaw I once knew very well by that name. One of my many retail experiences was co-managing a pet store. The original Buttons belonged to the store owner and lived in the store. Definitely one of the highlights of that particular job!

I found a volunteer long arm quilter for Who Let the Dogs Out?! so I am now free to move on to my next project. It may be time to play with those text prints I've been collecting lately...

Monday, February 20, 2012

"Who Let the Dogs Out?!"

This quilt has required more effort than its' predecessor (Syncopation). Eventually I got all the rows for the body of the quilt together though, and then it was time to audition prints for the narrow frame.

I'd been mulling this over while I was sewing those long final rows together. My concern was that a light print wouldn't have enough contrast with the body and borders. Without sufficient contrast there would be no point in putting in a frame at all! I was thinking a contrasting color would be needed. I held a lot of folded yardages up to the quilt on the design wall. A couple of them even had 1.5" strips cut off and put in place so I could get a better idea how well it would work. In the end it was a narrow, irregular black stripe on an ivory or cream ground that won out.

It reads as a light print overall but the black stripes provide enough activity to give the eye that separation between the two parts of the quilt. I'm very pleased with the result. I do love me a stripe for a frame or binding. :- )


Back when I culled my strings for strips to use in All to Pieces I also pulled out strips that were about two inches wide. (All to Pieces used 1.5" strips.) They landed in this basket, and the basket migrates between the two sewing machines. I've been sewing these strips end-to-end between the seams of this quilt to keep my chain piecing going. Just in pairs and then adding another one or two as necessary to make a strip at least nine and a half inches long.


Eventually I will sew the strips into blocks that will finish at nine inches. That means six strips per block. This is going to be a long term project, and the blocks will probably end up in my Parts Dept. for some time before going into a quilt. I also went through my super long strings this weekend and cut most of them down to about 21 inches to make them easier to work with. They still look pretty long and skinny to me though. I may have to cut them down further. I seem to gravitate toward shorter seams, more intimate work.

After these last two quilts - not even twin size, but big enough that I'm working on something bigger than I am - I'm ready for a small project again. And bright colors after all this brown! The scraps from this quilt are nagging at me to make some liberated stars for the Parts Department. I think I'm going to have to take the upper hand though and find something cheerful and bright to play with for a bit. Who Let the Dogs Out?! still has to be layered and basted and tied or quilted but I have enough time to take a short break to have some fun. ;- )

Friday, February 17, 2012

Strips & Strings

While I was finishing up Syncopation I learned of the date that our local humane society is holding their annual fundraising auction. I always want to contribute to the Humane Society's auction but have only done so a couple of times. As quickly as Syncopation went together I figured I could pull off another quilt of the same pattern in time for the humane society auction. The first thing I did was to pull out my stack of dog prints.

There were many that felt too juvenile for the quilt I wanted to produce, and there were a couple of prints I wanted to keep especially for myself. But! there were enough prints in the brown family to get started with.


I cut strips and started sewing. I had to bring in additional prints of course. Even so, I don't think I had quite as many in my palette as I did with Syncopation. That became more obvious when it came time to arrange the strips on the design wall.


It was hard to keep prints from running into each other or just showing up too close to each other for my taste.

Then yesterday, when I had all the strips on the wall to my satisfaction and started sewing the rows together, the bottom half of the wall shed all of its strips onto the floor.


Aaarrrrggghhh!! Fortunately, I had a photo of the arrangement I liked best. Thank goodness for digital cameras and laptop computers! I was able to bring up the photo and have the laptop on the floor next to the design wall to help me get the strips back in place. With pins this time.

Inbetween work on this new quilt I took some time to check out Brenda's String Thing Along. It dawned on me that I have been making string quilts without realizing it. This one and Syncopation could be considered to have been constructed with fat strings. ;- ) And then there was All to Pieces, (which is waiting to be tied or quilted). I have now joined up with the others to share my stringy projects on Brenda's blog. I have a couple of string-thing quilts on my To Do list. This will be a perfect opportunity to get at least one of them going. :- )

Monday, February 13, 2012

Swap Quilt Reveal

Julie has received (and posted) the little quilt I made for her. I'll share it here for those of you who aren't regular visitors of Julie's (you're missing out on a good thing, let me tell you!).

We had been discussing, via email, one of her favorite books. She offered to buy and send a copy to me in exchange for a little art quilt. It didn't take me two seconds to make up my mind. ;- ) This was back in the fall. I pieced up a couple of three inch heart blocks right away, in colors I thought would please her. Then I got stuck. And then the holidays came and I was busy making a Halloween quilt... and I was starting to feel guilty that I hadn't lived up to my end of the bargain. Julie was very understanding of course.

After New Year's and some journaling an idea came to me to turn the heart blocks into flower blossoms. I had a blast creating a name for this new species of flower. Introducing Cardiaflorum sympaticae:

They are a rare species, found in secluded, sheltered corners of the world. They have their roots in the soil of blessings and secrets and gifts of the spirit.

I used seed beads to create flower "petals" and then did some outline stitching with embroidery thread to create veins in the leaves. The stems are braid secured with more seed beads.

The root system for the flowers was made with vintage rectangular sequins. I had to add a fairy to tend the flowers of course.

This was really fun to create, once I got started. It was one of those pieces that was hard to put down at the end of the day. Love that!

Wednesday, February 8, 2012

U-Turn

I'd have been back sooner with a finished product but I ran into difficulties after the top was completed. My original idea, while I was piecing, was that I would tie this quilt. The overall design just seemed to call for it. But when the top was done I thought this might be a good time to try out the serpentine stitch on Ruby Blue.

It did not go well. First of all, I didn't get the backing fabric taut enough when I basted the layers together. I also had faulty batting. It was supposed to be Warm & Natural but we accidently brought home a Pellon product instead. It appears to have been their answer to Warm & Natural but it was alternately thick and thin, so thin you could see through it in places. Not a quality product.

And the stitch I was so looking forward to using turned out to be less satisfying than I had hoped. In fact, I couldn't get the results I wanted at all, in spite of everything I tried. I carefully unpicked the six seamlines I had quilted at that point. We returned the batting for a refund and bought the real deal this time. I got out my number 5 perle cotton, loaded two strands in an embroidery needle, and set to work again.

There were still issues with the backing but I think I fixed them adequately. Overall it looks pretty good. I'm sure after some time has passed I will feel better about the end product. I named it Syncopation. My hope now is that it will at least bring in an amount of money equivalent to the cost of the materials I used in making it.

Wednesday, February 1, 2012

Flimsy!

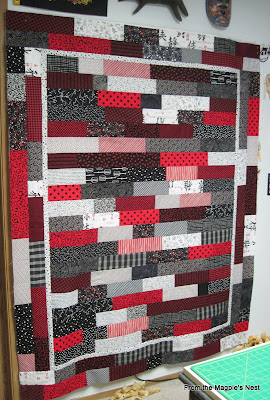
I do believe this is the fastest quilt top I've ever constructed.

Over the weekend I cut 3.5" strips from various black and white, red and black, and white and black prints. Monday I sewed the strips together in pairs until I had about 25 "rows" started. From that point on I just cut a strip free from the machine, added another strip to it, cut another strip free and added a strip to it, etc. Before too long I had this:

Some strips were longer than others. I found the shortest ones and brought them up to the size I wanted for the width of the central panel of the quilt.


Then I started pairing up rows. By the end of the day I had the bulk of the quilt top done!

Yesterday I put a 1" frame around this center bit and began working on the borders. I'd used most of my pre-cut strips by this time so at this point I started auditioning and cutting prints as needed. I had to fold the quilt top in half and pin it to my design wall to work on one side at a time.

This morning I put the final pieces in place and...


TA DAA!
This is the best picture I can get of the whole thing without going outside.

My plan is to go get batting and backing today and have this quilted by the end of the week. For the quilting I think I'm finally going to use the stitch on Ruby Blue that was the driving factor in her purchase. I tell you what, she sure gobbles up the fabric when it come to long, straight seams! (In a good way.) No wonder she's such a big girl. ;- )

If you discount the time I spent cutting fabric, and if I hadn't had to stop sewing last night to accommodate family needs, this top would have been created in two days' time. Whew! I know others do that regularly but for me it's a first. :- )