Showing posts with label tutorial. Show all posts

Friday, December 1, 2017

The Tortoise Finishes Another Race

Slowly, slowly, I've been working on this blue Patience Corner quilt. The blocks were made by my friends in my local quilt guild. I set 36 of them 6 x 6.


Then I framed them up to make an 84" top. (I also moved one block to get that X in yellow through the center of the quilt!)


It sat for a while before James got around to quilting it. As usual, he did a lovely job for me. 😊


He used a simple overall design he calls 'water' through the body of the quilt, then these circles in the inner border and waves in the outer border. All freehand I might add!

It's too wet and windy to go outside for a proper photograph and I don't feel like wrestling with it to hang it in the studio for a portrait. Here it is draped over the long-arm, minutes after I finished sewing down the binding:


Since that picture was taken I've washed the quilt and now need to ink the label. My intention is to donate this to our local women's shelter. How they choose to use it is up to them. I've adapted the fast corner triangle technique Ami Simms advocated for hanging small art quilts to make labels for my bigger quilts.


For a quilt this size I cut a 5" square of my label fabric and fold it in half diagonally once. The raw edges of the label are then lined up with the raw edges in one corner of the quilt (before I apply the binding). I sew it in place with a narrower seam allowance than I will use for the binding. After the binding is applied by machine and then sewn down - which I do by hand as a personal preference - I celebrate by blind stitching the single folded edge of the label patch. The quilt is laundered before I inscribe the label with my Pigma Micron pens. As long as I don't try to rush the process, stretch and hold each section of the label with my left hand while I'm writing on it with my right, I don't have too much trouble writing on the fabric. You just have to go slowly and let the ink settle into the fibers. In addition to who made the quilt, where or why and when, I'm usually able to include simple laundering instructions on these labels. You know, something like "machine wash/dry, gentle cycles, low heat." And away we go!


Thursday, October 15, 2015

ScrapHappy October and a Tutorial

I'm linking up with Kate and Gun today to share one way I use up scraps here in The Magpie's Nest. I'm even going to attempt a tutorial!

When I was planning to create a border of Bow Tie blocks around my latest Parts Department quilt I discovered that I didn't have quite enough to get all the way around. It didn't take long to make another dozen.


Let me show you how I do it. :- )

Six inch Bow Ties are a great way to use up 3.5" and 2" patches. You need two 3.5" squares of two different prints, and two 2" squares of whichever print you want to be the Bow Tie (as opposed to the background). For the purpose of this tutorial I'll use white for the background and a black print for the Bow Tie and its' knot. We'll be piecing one part of the knot of the bow tie onto the two background squares.


Lay the little square right side down on top of the larger square, placing it right up into the corner and aligning two raw edges. Then you'll want a smallish acrylic ruler marked in quarter-inches. Lay your ruler on top of the two patches with the quarter-inch line running through the two opposing corners of the little square.


I have an overhead light making a reflection on the ruler. Here's a close-up:


See how the quarter-inch line is running right through the corner of the patch? This process eliminates the need to draw a line down the middle of the little square. Even if the two patches shift on their way to the sewing machine it's easy enough to line them back up again.

Once you have your ruler placed accurately use your rotary cutter to cut off the little triangle not covered by the ruler.


In this case I throw those little triangles away. When I'm making 3" x 6" flying geese I keep the off-cut triangles and sew them together to make my scrappy Broken Dishes or Pinwheel blocks.

Sew your altered patches together with a quarter-inch seam allowance. Repeat the process with the other little square and background patch.


The next step is to pair these units up with the remaining 3.5" patches to create your bow tie. Here's what the back of my block looks like before I sew the final seam:


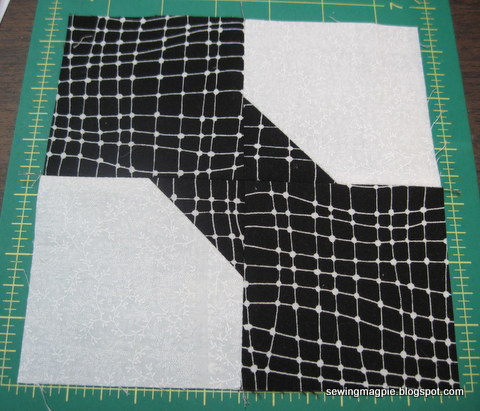
And here's the completed block:


I like to use these blocks between seams (as leaders and enders) when I'm working on other projects. The seams are all short and the block is simple to assemble. Now to decide whether to make a scrappy Bow Tie quilt out of these blocks or to hang onto them to use as a border in the future!


Wednesday, July 13, 2011

Flying Geese Tutorial

I thought I'd share with you how I'm making my Flying Geese between the seams of other projects. It involves a quick trick I don't think is well known amongst the quilting community.

I'm beginning with 3.5" x 6.5" rectangles and 3.5" squares, one rectangle and two squares for each goose. (You can use whatever sizes you want of course!) Next to my sewing machine I have a small cutting mat, and I keep a rotary cutter and 6" ruler there too.

The rectangle will be the goose and the squares will be the background. At least, that's the way I interpret these units! Begin by laying one square, right side down, on top of the right end of your rectangle. At this point I think most folks would have you draw a line diagonally through the square, from corner to corner, and then you would sew on the line and remove the excess. I can't be bothered to draw any lines. I just lay the ruler on top of my fabrics with the one quarter inch markings falling on that invisible diagonal line corner to corner.


Here's a close up of what I mean:


Now I'm going to cut away the excess fabric. This will leave me with a perfect 1/4" seam allowance built in.


I put what's left of the rectangle and the square under my presser foot and sew the seam. You should note that I have a 1/4" presser foot on my machine. I'm not sure this technique would work for those who do not have an easy and reliable way of creating a quarter inch seam. I haven't done it with any other foot!


I also run the cut-away triangles through the machine and I have this:


Next comes what I find to be the trickiest part of the process: getting the second half of the unit made correctly! Lay out your second square on top of the rectangle, right sides together again but at the other end.

In order to have the background print end up where I want it, I have to turn the whole shebang and work from what would be the top or the point of the flying geese unit. Also, because I'm right handed, it's easier to cut that way.


Lay your ruler on top of the fabrics again, with the quarter inch marks along that invisible diagonal line from corner to corner of the background print. Cut away the excess, creating your built in seam allowance. You will be cutting off the merest tip of your previous seam; don't worry about it.

You see, instead of drawing a ling and then sewing and cutting you just create the line with your ruler and make the cut first, then sew! When you're all done you should have one Flying Geese unit and two leftover half square triangle units. I leave my triangles as is and sew them into Pinwheel or Broken Dishes blocks but they can be trimmed down to a consistent size and used in any number of ways.


I hope this has been clear and will be helpful. If you have any questions feel free to leave a comment and I'll offer whatever help I can.