Before I ever started piecing and quilt making I was active in the needlearts. It began with traditional embroidery, as it has with so many others. I tried crewel work and cross stitch, blackwork, Swedish weaving, and latch hook rug making. The interest that surpassed them all in those days was needlepoint. I still have many of the books I collected back then - even though I can't safely read or look through most of them. If I'd known there was a certificate or degree program in the textile arts I would have taken that route when I was pushed into college. Instead I found myself in business administration courses. The best part of my college years wasn't the official education I was getting or even the friends I made. It was the access to glorious shops full of colorful yarns and intriguing painted canvases in south central Ohio.
I doubt those shops exist now, although I have not taken the time to find out. Both of the shops we had in this area that catered to needle artists have closed. Obviously I can - and have to, in general - shop online but it just isn't the same. You can't see the colors or feel the textures the way you can in person. But I'm probably preaching to the choir here. Back to the point...
I put away my needles and threads and canvases when the children came along. It just wasn't practical to have those sharp things and expensive materials laying out where little hands could get hold of them. We didn't have a lot of room in those days either, for putting things out of reach. So a lot of it got packed up and put away more or less permanently. Some of it went away altogether. It was only a matter of time before I had to find new ways to relieve stress and that's when piecing quilt blocks came along. They've had a firm hold on me right up until I injured my shoulder in January.
Regular readers will know that I have returned to the needlearts as my shoulder is slowly healing. You've seen the little needlepoint cases I've been churning out. As you know, one thing leads to another. I've found groups on Facebook where stitchers meet and share their work and questions. I've discovered Fiber Talk and Stitchery Stories, a couple of podcasts I've been enjoying and learning from. I have also unearthed one needlepoint canvas I couldn't bear to part with when I was purging my supplies back in the day. It occurs to me that this is probably my oldest UFO. It dates from the end of the 1970's.
The image area is ten inches wide and about 7.25" high. The horses are all stitched in DMC floss. The background was stitched with a wool yarn, probably Paternayan. I can see two reasons why I stopped work on this piece. I didn't know how to meld the upright mosaic stitch I used in the background with the tent stitches of the horses. Worse than that, it doesn't look like I have enough of the wool to complete the background. This wool has to be a good 40 years old. I doubt I could even begin to get a matching dye lot, especially since there doesn't appear to be the hint of a label in the bag this was stored in.
I still don't know exactly how best to move from the textured background stitches to the smooth tent stitching of the horses. What I have decided to do, at least for the moment, is to use what wool I have left to fill in around the horses with more tent stitching. I'm also going to remove a good deal of the background. I may have to remove all of it eventually. I don't yet know what I'll use to replace it, either thread type or color. The removal process has already begun. Let me tell you, it hasn't been easy!
The other thing I'm discovering is that I'm not all that interested in doing fancy stitches for the background, which seems to be the popular thing to do these days. Frankly, I enjoy doing tent stitch, basketweave style. I find it soothing. I do not enjoy working with the wool yarn however. Having filled in around the horses with tent stitch in that wool provides a nice contrast in texture and color but I'm going to want to transition to something else somehow. I also like the idea of preserving at least a tiny bit of the original materials used on this piece back in the day. I may try to keep some of those mosaic stitches, maybe around the perimeter or just along the bottom. I've come to a place in my life where I can work on this just to please myself, no one else. That's an accomplishment in itself.
In the meantime, I've also succumbed to temptation and purchased a small hand painted canvas to stitch. 😁
The image is only about 5.5" tall and 3" wide but there's lots of canvas around it for me to play with one way or another. You may be able to see that I bought this from The Wool and The Floss in Michigan. I learned about the shop from one of the older Fiber Talk podcasts and fell in love with this guy immediately while browsing their website. A hand painted canvas is a real splurge for me. No guessing where the stitches are meant to go though, so it should be a joy to stitch. Plus it gives me the perfect excuse to use some of the delicious floss I've been accumulating from the Victorian Motto Sampler Shoppe!
This seems to be a rather link-heavy post. I'm not getting any kickbacks from anyone, just so you know.
Being (mostly) an account of the creative endeavors of an artist and collector whose wings have been clipped by hypersensitivity to the chemicals in our everyday environment.
Showing posts with label UFO. Show all posts
Sunday, May 12, 2019
Monday, July 30, 2018
Bee, Myself & I in July
Last month I showed you the beginning of a new quilt I'm making for my own pleasure - which is the essence of the Bee, Myself & I challenge. I'm making a version of the free Rainbow Blur pattern offered by Free Spirit Fabrics. I'm using featuring botanical prints from the Kaffe Fasset Collection.
After making another 22 four-patch blocks in the correct size the top is complete:
It will measure about 60" x 75" when it's eventually a quilt. Before that can happen I had to come up with a back. There wasn't enough yardage of anything in my stash that would have been appropriate. I haven't felt like shopping this month either. However...
Back in January of 2013 I made my first flimsy using the Jelly Roll Race or 1600" Quilt process.
I love the colors and prints in the batiks but wasn't overly impressed with the end results. So this has been living in the closet on a hanger ever since. I thought the day might come when I'd be courageous enough to cut it up and rearrange the parts for a more interesting design. It hasn't happened in over five years. I've also trotted it out once in a while to audition it as a quilt back. It was never right for that purpose either... until now. 😊
The colors are great with the Kaffe prints. All it needed was a bit more width and length to accommodate long arm quilting.
James, my quilter-son, is busy performing in three separate Shakespeare plays into the middle of August so there won't be any quilting taking place until the end of that season. I'll have to find something else to work on for next month's end-of-the-month post!
Thursday, April 26, 2018
No Longer A UFO!
I have avoided the accumulation of UFO's (UnFinished Objects) since I accepted the fact that staying home is the best way for me to stay able-bodied. It's much easier to start and stay with a project when you don't have the distractions of work or other outside commitments. So there was a bit of psychic discomfort over the fact that I started and then stalled on a quilt for almost two years.
It all began with this darling panel:
When I first started working with it I added flying geese across the top and bottom.
Then I made sawtooth stars with fussy cut centers to frame the panel.
It was after I'd sewn these stars together and to the panel that I truly got stuck. The flimsy hung in the closet for nearly a year. When I brought it out again last summer I decided to make Bear Paw units to create another framing border. I chose a whimsical print that was just waiting for the right project to come along. I used fussy cut images from that print for the pads of the bear's paws...
But of course there weren't enough to go all the way around the quilt top. I was also concerned about sufficient contrast between the block and the background. So the paws and the flimsy were put away again.
I needed some fairly mindless work to keep me distracted from headaches earlier this week. I decided to just make more Bear Paw units out of the overall print I'd used for the claws in the fussy cut blocks. I also used a quieter background for the new paws. At the end of day one I finally had enough to go all the way around the flimsy. The next day I arranged the paws down the sides of the quilt, using more of that black Moda marble as sashing. Things were looking better by this time.
Yesterday I created the top and bottom borders out of the remaining bear's paws. That's when I also decided to frame the whole thing with a narrow border of the print I'd used between the stars and the paws at the top and bottom. There was just enough of that old print to do the job. 😀
Tadaa!
I was really worried about this project at various points during construction. Now I'm very happy with the way it turned out. It's officially a twin size top, so larger than I've been accustomed to making of late. I haven't yet chosen a backing fabric for it. I suspect this will be custom quilted rather than the usual meander or overall quilting my quilts generally get. James will have a chance to flex his creative quilting muscles for a change!
Thursday, December 14, 2017
Scrap Happy in December
Not much actual sewing is taking place in The Magpie's Nest these days, partly due to the holiday season and partly due to the toxic exposures that come with the holiday season. I didn't think I would have anything for Scrap Happy Day this time around. Then one day this week I wanted to do some hand embroidery. Specifically, I wanted a place to practice feather stitching. I rummaged around and found some crazy piecing I'd done years ago, with the scraps from a doll quilt I'd made for my daughter. (Which gives you an idea how long ago this was pieced: my daughter has four daughters of her own now!) The doll quilt was something like 18" x 20." This piece would finish at about 8" x 10."
I'm using - of course- some of Nancy's hand dyed floss.
By the way, there's still time for you to hop over and sign up for her advent give-aways. Two prizes have already been awarded but you've got ten more chances! Well... nine by the time you read this probably. She will ship internationally so don't think you can't enter if you're on another continent.
I discovered that I'm more comfortable working the feather stitch with the work upside down rather than right side up. Although I haven't quite wrapped my head around working the stitch from the bottom up as it were. If that's even possible!
I have no idea what else may happen to this bit of crazy patchwork. There are a couple of short seams to cover yet. After that I may create some false seam lines just to break up the longer patches a bit. I have no idea what I'll do with this once I've finished embellishing it either. Might make a fun journal cover...
Kate over at Tall Tales from Chiconia has a whole list of folks who've been playing with their scraps if you need some inspiration or just some eye candy. 😉
Saturday, May 2, 2015
Finishing Up Purple
I found a couple more remnants in purple to cut up and make into 12" Ohio Stars.
There are some scraps of the prints that went into the two Rusty Stars quilt tops to use up so I made a 9" Ohio Star too.
Here are the six inch blocks I made out of the smallest purple scraps:
They will go into the Parts Department for the time being. But! I came across a few other six inch blocks I'd made a long time ago that, for some reason, didn't make it into the Parts Dept.
These had been stashed with the rest of my collection of Depression-era reproduction prints. Participating in the Rainbow Scrap Challenge this year prompted to get them out and use them up.
Last Saturday I saw a Quilt in a Day episode in which Eleanor Burns demonstrates a technique for making pairs of 9 Patch blocks. I've never been a particular fan of making 9 Patch blocks. Inevitably I end up with too many of the X blocks and not enough O blocks to create a checkerboard effect. With the technique Eleanor demonstrated you're able to make one of each all in one go. Perfect! Look what I did with the purple (lavender) prints in that short stack of fabrics:
That's 20 blocks. I've made 70 blocks this week using this method. My left arm is complaining loudly but I'm thrilled to have a healthy start on a new quilt top. It will be fun to figure out how to combine the 9 Patch blocks with the other miscellaneous 6" blocks I've made up in the Depression-era prints.
I'm linking up with the other RSC players over at SoScrappy today. Now that we're in May our focus will be on green. Angela suggests dividing our green prints into dark and light groups and working with the dark greens this month. I have mixed feelings about this. There are not a lot of dark greens in my stash. The dark greens I prefer don't seem to be available currently so I'm reluctant to use up what I have. I may have to split my greens into yellow-greens vs blue greens instead of light and dark. We'll see what I turn up next Saturday in the Scrappy Saturday post!
There are some scraps of the prints that went into the two Rusty Stars quilt tops to use up so I made a 9" Ohio Star too.
Here are the six inch blocks I made out of the smallest purple scraps:
These had been stashed with the rest of my collection of Depression-era reproduction prints. Participating in the Rainbow Scrap Challenge this year prompted to get them out and use them up.
Last Saturday I saw a Quilt in a Day episode in which Eleanor Burns demonstrates a technique for making pairs of 9 Patch blocks. I've never been a particular fan of making 9 Patch blocks. Inevitably I end up with too many of the X blocks and not enough O blocks to create a checkerboard effect. With the technique Eleanor demonstrated you're able to make one of each all in one go. Perfect! Look what I did with the purple (lavender) prints in that short stack of fabrics:
That's 20 blocks. I've made 70 blocks this week using this method. My left arm is complaining loudly but I'm thrilled to have a healthy start on a new quilt top. It will be fun to figure out how to combine the 9 Patch blocks with the other miscellaneous 6" blocks I've made up in the Depression-era prints.
I'm linking up with the other RSC players over at SoScrappy today. Now that we're in May our focus will be on green. Angela suggests dividing our green prints into dark and light groups and working with the dark greens this month. I have mixed feelings about this. There are not a lot of dark greens in my stash. The dark greens I prefer don't seem to be available currently so I'm reluctant to use up what I have. I may have to split my greens into yellow-greens vs blue greens instead of light and dark. We'll see what I turn up next Saturday in the Scrappy Saturday post!
Saturday, August 30, 2014
A Little Helper
Well, here's how I filled that hole in the third side of the Parts Dept. quilt top:
And then it took me the better part of the week to create the fourth side:
Which doesn't sound so bad now but it sure felt like slow going during the week. Of course, the migraines don't help. I still haven't laid out all the blocks around the top to make sure I'm happy with their current placements but that day will come.
Because I haven't felt up to that task but because I had to stitch something I turned to a UFO. This one happened to be a doll. The pattern, some of the fabrics, and the inspiration came in a package from Alma Stoller early in 2010 as far as I an remember.
She's only a little stump doll (meaning she has no legs) about eight inches tall.
Longtime readers may remember the stamped swatch of muslin that crosses her chest:
That was in the package of goodies from Alma. I foundation pieced the scraps of fabric to create the front and back body panels. Her arms are stuffed with a bits of Warm & Natural batting. Then she was whammied by my magic beading needles. ;- )
Even on her back!
Her hair is a bit of fancy trim. I debated whether to leave her face without features, like the Amish do. In the end I used a couple of beads for eyes and a heart sequin for her mouth.
I'm especially pleased with the application of the 'dream' charm.
Since she is part self-portrait and part motivation angel I gave her scissors and something to work on.
All I have to do now is clear off some space near my main work station so she can be nearby to do her job!
Monday, July 21, 2014
Hatched!
I've had my laptop back for nearly a week now. Unfortunately my body hasn't been co-operating much of late. It's always something isn't it?!
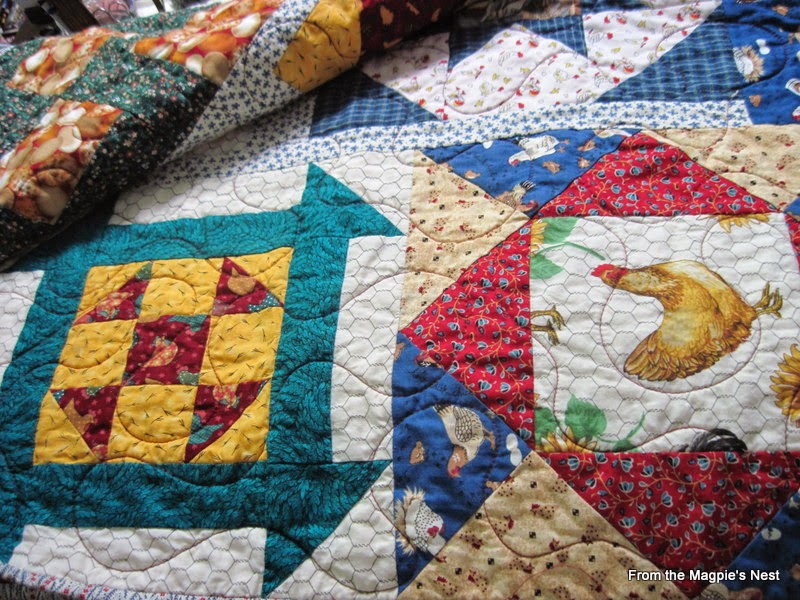
Let's get right back to the chicken quilt I was working on before I dropped my laptop. I had the central feathered star surrounded by an assortment of blocks featuring chicken prints.
I remember commenting that I wasn't sure about the print I'd chosen for the sashing. I thought it might be too busy. Barbara was right; it looks fine to me now. :- )
I had to pleat the flimsy on the design wall in order to build the top out to the width I wanted for the finished quilt.
Here's what the finished flimsy looked like:
You'll notice that the blue print border does not extend all the way across the top and bottom. That's all there was!
Because the top is so busy I asked for a simple meander when my son did the quilting.
It's rare that I will choose a light color to bind a quilt but it was the best option I had in this case.
I haven't been able to get a full shot of the completed quilt yet. In the picture below you can see what I chose for the back. It's not quite the same red as what's in the front but close enough.
I finished another flimsy while the laptop was away. I'll have to show it to you in my next post. ;- )
Thursday, May 15, 2014
The Chickens That Came First
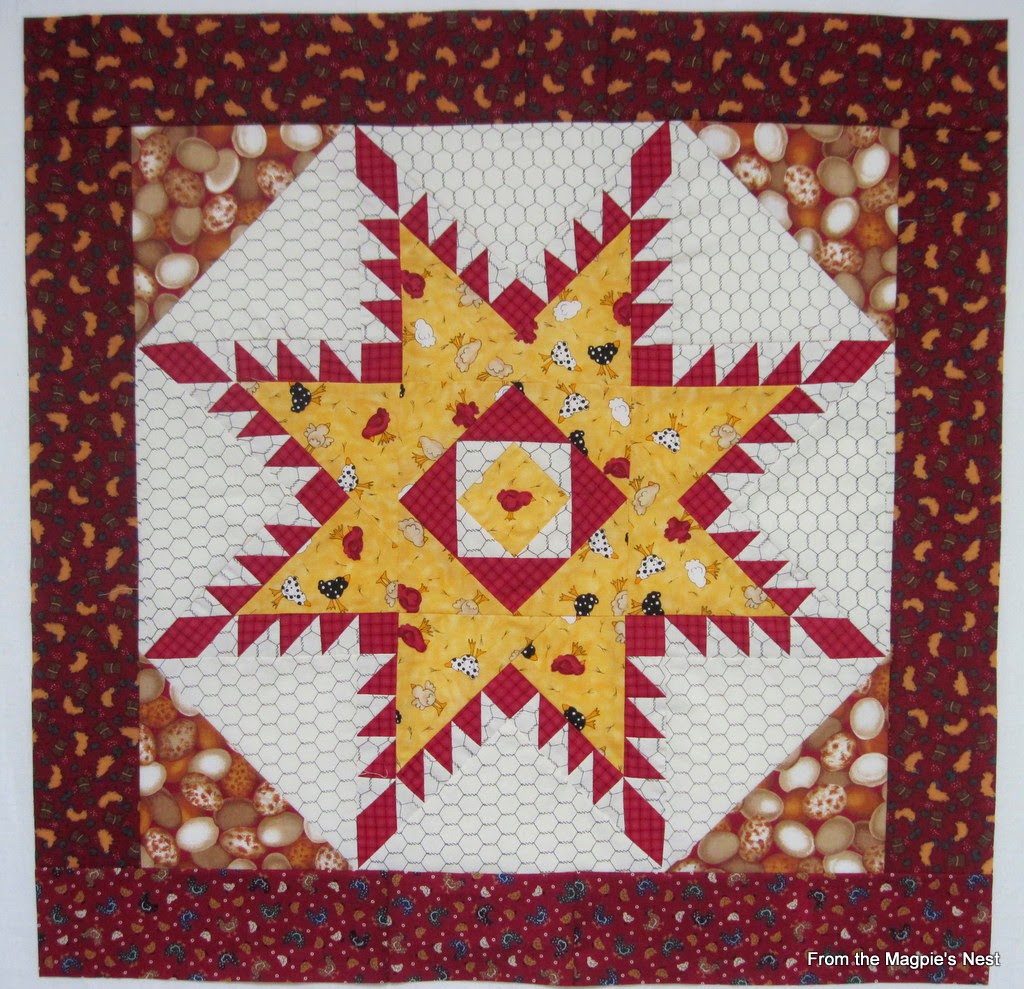
Making a chicken themed quilt has been on my Quilt Bucket List almost ever since I started piecing back in the late 1980's. The first block I made for that prospective quilt was an ambitious one, a feathered star. It only made sense to me that a feathered star should feature chickens!
I don't have a picture of the block in its original state. It took several years (try a decade or more!) to actually get the block together. The block was begun in a class setting. It was supposed to be an easy and accurate construction method, which is the only reason I took the class. Well, the long and short of it is that it may have been easier and accurate for a more experienced quilter than I was at the time but it wasn't for me. I was working with a 40 year old machine and did not have a good way to maintain the quarter inch seam allowance that would have given me better results. I got the star points mostly assembled during the workshop and then managed to make a star out of them years later. I had grown enough by then to be able to let go of complete accuracy. I think the finished block was supposed to measure 18" square. Mine was over 19" by odd fractions in its raw state. I could have made my peace with that but there was something else about it that bothered me. It took me a couple more years to figure out what that was: in spite of the fact that I'd used a print for the background there seemed to be an awful lot of empty space around the star. Experience and maturity came to my rescue again. I solved the problem by cutting the corners off and replacing them with another print. The next stumbling block was how to bring the block up to a size I could work with. Well, that wasn't really much of a problem. It was a simple solution really: add oversize borders and then cut the whole thing down to the size I wanted! Here's the end product:
This will finish at 24 inches square. It looks pretty good in this picture. Flaws and compensations are much easier to spot in person. ;- ) You can see that I'm working with limited resources too. One of the border strips is a different print than the other three. That might have bothered me back when I first undertook to make a feathered star. It doesn't bother me now! I'm happy to say that I have grown as a quilt maker, and not only in my technical ability.
So now the chicken quilt has become another place to play with a variety of block patterns. Back in the day I knew I wanted a chicken themed quilt but I didn't really know what my personal taste was. Now I know I enjoy making simply pieced blocks and puzzling them together into interesting and cohesive multi-fabric quilts.
This Card Trick block also features the main print from the feathered star:
I had four color-ways of one print in my stash so I decided to try them in the Card Trick block too.
There isn't a lot of contrast between the "cards" but it will do.
Of course I had to have some Churn Dash or Hole in the Barn Door blocks.
I do enjoy fussy cutting to feature a specific image! These are all 12" blocks.
When my friend C~ learned I was planning to make a chicken themed quilt she made this 10" block for me. This was several years ago as well. Without taking the time to look it up, I think this one is a Sister's Choice.
You haven't seen them all but I think I have enough blocks to begin developing a quilt plan... !
Wednesday, May 7, 2014
Sunday, December 8, 2013
Piecing Christmas
I think I'm going to have to make a New Year's resolution to be a more diligent blogger! In my defense however, I have been working on Christmas gifts that I don't want to make public yet. The trouble is that after Christmas I'll forget to share them with you!
A little progress has been made on the Christmas quilt (see previous post). I auditioned the 12" blocks with the medallion I'd made. I think they're going to end up as borders on the top and bottom of the flimsy.
There will be a couple blocks from that set leftover but they're not so Christmas-y that they couldn't go into some other non-seasonal quilt top eventually. There are more of the 9" Churn Dash blocks available. I think they're going to end up down the sides.
Not slap up to the Churn Dashes that surround the medallion; there will be something to separate them a bit.
I'm adding the length I wanted with two rows of 6" twinkling stars.
Each row will add nine inches in length (or height if you prefer). The extra three inches allows me to stagger the stars for effect.
It will likely be Christmas or later before this top is complete. Our elder son and his girlfriend are coming up from the southwest for a week long visit. That will eat into my sewing time (not that I mind!). There may not be any blogging during their visit either. ;- )
Tuesday, July 9, 2013
Celebrating Freedom
Over the holiday weekend I filled in the gaps in the lap quilt you saw in my last post.
This was a fun one to put together. I was able to incorporate old bits and pieces and come up with a very pleasing whole. :- )
To fill in those spaces in the top and bottom rows I created four of these skinny churn dash blocks:
They are four inches wide and six inches long. Even if I do say so myself, they're darn cute! This quilt was apparently meant to be because I found just enough of this old, old print to be the back. (Not old enough to be considered vintage but it's been in my stash for decades.)
And I have begun the quilting process already too!
In the meantime, I've pulled out another UFO with the intention of turning it into a lap quilt for one of the Alzheimer's Disease Co-operative Study participants.
This was the product of a challenge in my quilt group back in the day. As it stands now it measures 24" wide and 28" high. It became a UFO because I didn't need or have room for a piece of wall art that size and I didn't have a clue how to go about quilting it at the time.
If I were to do it now it would get beaded for sure. But I still don't have room for it in my home and I'd rather see it put to good use by someone else. All I have to do is figure out how to make it a bit bigger and then I can turn my son loose on it and let him practice his long arm skills. ;- )
Subscribe to:
Posts (Atom)