Showing posts with label maverick quilts. Show all posts

Monday, March 27, 2017

I Hope You Appreciate This!

I went to a lot of trouble this morning to rig up a way to photograph my larger quilt tops. Mostly because I want you to be able to see more completely what I've created. So in the end it was an entirely selfish move. ;- )

I had a set of four wooden clip sort-of things for a long time that were made specifically  to display quilts. I finally decided to try to put them to good use. That entailed taking down some of my elegant (cough cough) decor over the design wall. Whether it gets returned to place remains to be seen. I've hung the flimsy mostly over a door in order to move it from behind the cabinet that I use as a cutting table. There were some other bits of debris that had to be moved out of the way as well. It's a case of making things worse in order to make them better. I'm not a fan of that process. I've got the quilt top hung but now I have to find new places for all the stuff I moved out of the way - at least I do if I want to hang another flimsy more easily in the future!

But enough whining. Ta-daa, the wedding quilt!


Okay, so ignore the ruler I didn't realize would be in the picture. This will finish at about 60"' x 80," my favorite size for a couch or comfort quilt. The vertical orientation might not be the best for a cuddle quilt but it'll have to do. (Do I have an attitude this morning or what?!) At least the backing print will run horizontally. I think I found the perfect print for this couple who love forests.


The embroidery I worked on so diligently did not make it into the final composition. It was just too black. Everything else that was dark was in tones of blue and brown. Fortunately I found a bit of an old fabric I'd been given probably 20 years ago that was an almost perfect substitution in terms of color and theme.


Just another example of why I refer to my studio as the Magpie's Nest: I collect and hang onto everything that has potential! (Sounds better than the Pack Rat's Hole doesn't it?)

I was able to spell out the surname of the newlyweds from a panel of decorative letters. That was sheer providence.


The letters are very pale. I'm trusting James to successfully highlight them with his quilting. By the way, he's running a discount on his services from now until Easter. You can reach him through his Facebook page or send me an email (suebrown360(at)comcast(dot)net). Our eldest granddaughter will be receiving her new quilt today, built my me and quilted by her uncle.


One of those pinks had the nerve to bleed. I generally throw in a dye catcher when I first launder my new quilts (plus I've pre-washed all my fabric) but I wonder if I neglected that this time around. I avoid using them as often as I can because they are yet another item that sets off my chemical sensitivities. {sigh} I'm prepared for reds and maybe purples to bleed but pink?

I might also be cranky because I have this pile of quilts that need to be bound:


I don't mind sewing the bindings down but I do not enjoy wrangling the quilts to get the binding applied. I only have binding prepared for the one on top, which happens to be the smallest. Before I even try to find appropriate fabric to bind the others I think I'm going to have to go do something fun!

Tuesday, March 21, 2017

Head Down, Nose to the Grindstone

I haven't dropped out of Blogland altogether. I'm just using my healthy times and energies to move the wedding quilt along. Progress has been made but I don't think I'm going to have it finished in time for the day of the wedding. That has been a fantasy from the beginning because the wedding day is so close to the time I learned of the engagement. Now I'm being forced to admit probable defeat. Oh well. It will get there when it gets there and hopefully the newlyweds will enjoy my efforts. It's going to be a one-of-a-kind quilt, that much is certain. A Magpie Sue Original without question!

I began by making stars to go around the top half of a digital print:


This is by no means where the stars will end up. I'm just turning fussy-cut 4" patches into 8" sawtooth stars and sticking them on the design wall.

Then there will be this embroidery:


I haven't quite figured out how to incorporate it. There's a whole section through the middle of the quilt that hasn't been resolved in my mind yet.

I have a bottom row nearly complete but there's no point trying to show it because it's in such light tones I don't think I can do it justice in a photograph.

Most recently I've been making these log cabin blocks around smaller fussy-cut patches.


The idea was to balance the castle panel with the log cabin blocks. I didn't realize how much I had to build up the panel to make it fit. I'm going to have to come up with multiple framing strips or something instead of simply bordering the panel with one or two prints as I originally thought.

All of the fussy cut patches are intended to reflect the various interests or experiences of the bride and groom. Part of the fun has been in collecting appropriate prints. When I saw the discrepancy between the log cabin blocks and the castle panel (meant to represent Hogwarts, the school for wizards from the Harry Potter novels) I sort of got stuck. The best remedy for that kind of obstacle? More fabric of course!

Hopefully these will help me figure out how to proceed. Once I get the individual sections assembled building the quilt top should be a piece of cake. Just don't expect to see me anywhere else in Blogland for a while!

Wednesday, February 22, 2017

PDQ Progress

P.D.Q.= Parts Department quilt, pretty darn quick!

To recap, last week I started with a couple of chicken themed orphan blocks out of my Parts Department. They ended up creating this medallion:


I decided to build another strippy version quilt rather than a medallion quilt. To that end I added only to the top and bottom of the original square. I pulled more blocks out of the Parts Dept. but had to make a couple of new ones for a more cohesive look. (Yes, even with a multitude of scraps you can achieve a cohesive design!)


Another goal was to use up some of the scrap strips in my collection. I had Chinese Coin iterations on my mind but ended up making half log cabin blocks instead.


This made a nice dent in my inventory of 6" scrap blocks. :- )

I used a handful to top off what I've been thinking of as the central column for this quilt.


There's a similar row at the bottom of the column. The rest of the blocks were divided into two groups for secondary columns. To achieve the same length as the middle column I had to throw in the occasional extra strip.


Naturally, I can't get the whole thing into one picture!


Hopefully you get the idea. The challenge now is to decide how wide to make the vertical sashing and borders. And whether to make them whole cloth or out of more scrap strips. Or whether to use vertical sashing at all! I need to get this finished up p.d.q. as now there's a wedding quilt to build for an April wedding. :- )

I've just found out about Kat's Sew Some Love link parties on Wednesdays. Since this quilt top is intended for donation through this year's Hands2Help quilt drive I'm linking up!

Linking to Quilting is More Fun than Housework where quilts from orphan blocks are being featured. ;-) 

Saturday, May 14, 2016

A Dent in the Drawer

So apparently the cure for flagging enthusiasm is starting a new project. After I made my baskets for the liberated medallion QAL (yes, I decided to participate and I made two baskets!) guilt sent me to my Parts Department.  If I'm going to be making a new quilt I need to do something about the Parts drawer that I can hardly get open anymore.

First I counted up 71(!) six inch ship blocks.


I don't know how many I'll need but I'm not quite ready to set them sailing yet.

What about 12" blocks? Starting a new quilt with big blocks makes for rapid progress. ;- )


My go-to size for a personal or comfort quilt is 60" x 80." These blocks give me 48." All I need is some sashing. What's in the stash that's been there too long?


A wonderful, colorful Hoffman print from two decades ago. What next?

I have quite a few 9" blocks...


Ohio stars from the tail end of the Rainbow Scrap Challenge last year and some liberated stars from further back with almost the last of another old print.

Okay, that's a good start. Now what?

There are more 9" stars, mostly with white or light backgrounds. Let's see...


That could work. I rustled up enough for two more rows, alternating liberated and Ohio stars.


One of the prints my sister just sent me was ideal for the large borders on the top and bottom. I wanted to use another of the new prints for all of the horizontal sashing. My brain failed me at that point; I didn't realize there wasn't enough. Fortunately I found a print in my stash that worked for the wider strips that border the 12" blocks. Suddenly, I have a complete quit top! (And 28 fewer blocks in the Parts Department. Oh well, at least it's a start.)

Here's the lower right corner that my cutting table cuts off in the photo above:


Everything in this quilt was made from scraps or small pieces of yardage so I'm linking up with Kate and Gun for Scrap Happy Day and with the RSC quilters over at So Scrappy. You'll see lots of green in the RSC scraps this month. You never know what you might find on Scrap Happy Day! :- )

Tuesday, January 27, 2015

African Print Flimsy

Sorry to make you wait so long to see how my latest quilt top turned out. Because it's horizontally oriented it won't fit on my design wall and the rest of the house is too gloomy to get a decent picture. My Dear Husband pinned it up in the living room and used his fancy lighting equipment to photograph it for me. Let's see if I can access those pictures now...

They're probably big files too.

Yippee! Here's the top:


If you look closely you can see I used the same print at the top and bottom edges that went around the panels to build them up to 24" x 32". I used a vertically oriented print down the two sides to get the width I wanted. This will measure about 60" x 80" when it's a finished quilt.

I had just enough half-square triangles and one whole cloth square to make two columns to go down the center of the back of the quilt. Then I cut the rest of the end border print into two pieces and sewed them to each side of the column.

Oh! The picture is upside down!

I still have quite a lot of African print yardage but nothing else from that collection looked good with what I had on the back at that point. I found a batik in my stash that worked but had to add a bit at the top and bottom to allow for long-arm quilting. I'm pretty pleased with the results. There's no hurry that I'm aware of to get this quilted. I don't really feel like messing with binding something this size just yet anyway. My arm and shoulder are feeling better these days but they are not entirely healed by any means. I don't want to do anything that will set back the healing process!

I have a table-runner-type project that I need to tackle next. It's a commission to complete something another quilt maker started. I have cuts of fabric and a handful of blocks but no pattern or notes about the direction she was headed. I do know where the runner will be used and that will help to establish the final dimensions. I'm just hoping that once I finally get inspired this project will take off and be done in a short amount of time. The banner is meant to be installed in time for tulip season around here. Time is rapidly running out!


Tuesday, January 20, 2015

Climbing Back Into the Saddle

I felt so well the other morning that I picked up the patches I'd cut a month or more ago for a couple of friendship block requests and sewed the blocks together. Then I moved on to my local guild's current block of the month. I was able to pull nearly all of the necessary patches from my tin of pre-cut squares and triangles.


That was so much fun that I made another one the next day, again nearly all out of pre-cut patches.


I have one project that is hanging over my head but I haven't felt up to tackling it yet. I wanted something fairly simple to piece and sew. Last fall C~ passed a couple of batik panels to me from her stash. I've had quite a stack of African prints taking up space on my shelves; this looked like a good opportunity to get them out and finally do something with them.

The first thing I did was to trim the panels. I did my best to center them but they were printed off kilter on the fabric and have uneven edges to boot. I don't think my brain was quite up to speed yet either!


I put a second framing strip around the panels to bring them up to a size that would make the math easier as I continued to build the quilt top.


Here's a close up of the print I used:


The last couple of days have been spent pressing African prints and cutting them into 8" (finished) half-square triangles. This was not my original plan but I discovered that most of my African prints were only 9 inches wide or rough 9.5" squares. I needed bigger cuts for my original plan.

Now I have a pile of HST's to play with on the design wall.


I was thinking of a strippy set within a horizontal format. We'll just have to see how things develop!

Tuesday, September 9, 2014

What?!

How is it possible that it's been so long since my last post???! Technically I guess it's only been ten days but with the new calendar month it feels and sounds like longer. I can only plead poor mental and physical health as my excuse.

The Parts Department Quilt top is complete. It's also too big to get a good picture but I can show you this one, taken on the living room floor.


It turned out to be about 87" square. You can see in the lower right corner that I used the same sashing print that I framed the Lego center with to bring the 12" borders up to size. I also took the easy way out with the backing and bought a blue 108" wide paisley that was on sale.

In other news, I recently made this string quilt for my Dear Father-in-Law.


DFiL is an avid reader and historian. I began with the book print you see in the outer border and then searched out other prints that would reflect his interests. There are a few images that represent places he's lived or visited too. And filler text prints. I even threw in some Hebrew text for his love of the scriptures.

DFiL also enjoys putting together jigsaw puzzles. My DS the quilter did a fantastic job giving the quilt the look of a completed jigsaw puzzle:


Dad was overwhelmed when the quilt was presented to him during our family reunion. That's such a good feeling for the maker!

I based Dad's quilt on this one I made for myself in 2012:


I even used some of the same prints in both quilts. My quilt was entered in the county fair this year and was awarded both a first place blue ribbon and the Best in Class rosette!

Wednesday, August 6, 2014

Rippit, Rippit

For those to whom it matters, this is a photo heavy post.

Once I had the 12" Lego blocks arranged to my satisfaction I started auditioning Bow Tie blocks to surround the square flimsy. Setting them straight was just too static.


So then I tried alternating them to create a scallop effect:


That held possibilities! I could have kept to one color family per side but decided to mix 'em up a bit more.


In a burst of energy and enthusiasm I put 6" Churn Dash blocks in the corners and sewed the borders to the flimsy.


The next morning I found I wasn't exactly happy with the way this looked. Those Churn Dash blocks were just too small and wimpy up against the Bow Ties. I dug around in my Parts Drawer and found some 7.5" blocks to try as cornerstones:


Better. But in order to use those I'd have to take off the Bow Ties and add 1.5" all the way around the Lego block flimsy. {sigh} I decided I would do that if I could find an appropriate print. Otherwise I would leave it as is.

First thing the next morning my seam ripper and I were hard at work.

rippit, rippit!

It was worth it in the end:

 
Now I'm auditioning 12" blocks for the final round to create a full/double bed quilt top.


In spite of all the blocks that size in my Parts Dept. I'm having to make some new ones. Not everything in the Parts Drawer plays nicely together. ;- )

Friday, April 25, 2014

Time for a Spa Day

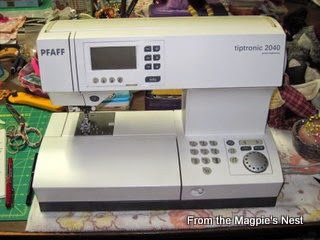
Wish I were referring to myself! As much as I would love a day at a spa it would likely make me very ill. No, in this case I'm referring to my beloved sewing companion Phoebe:


I've had to switch the brand of thread I use for piecing and I thought the issues we were experiencing were due to the change in threads. Apparently that's not the case. Phoebe needs a tune up. Truth be told, she's probably been overdue for a tune up for a year or more.

Before she left home I was able to finish up the Halloween quilt top. I think you may have seen it at this stage in my last post...


I added a lovely tone on tone purple across the bottom and the top and then used a fun orange Halloween print to cap off the ends. It was too big for the design wall at that point so we went outside to get a picture:


It was just a bit windy at the time. We were lucky to get a shot in between rain showers though!

I promised you a detail shot of the prints used in the Rail Fence blocks...


Pumpkins, bats, spiders and webs, more stars. All fun. :- )

I made up some blocks out of scrap patches too:


DS was able to get the top quilted for me yesterday. We decided on a simple meander since there was so much going on in the quilt already.


I've cut binding out of black but have to get a bit more to make it all the way around the quilt. This weekend is the annual street fair that's held in conjunction with the Tulip Festival. That will make it more of a challenge to get out and get supplies but my goal is to get this quilt bound as quickly as possible so I can donate it by the end of the month... which is next week!