Apparently there's a respiratory bug going around. My son was so kind as to bring it home with him. At first I thought I would be able to avoid succumbing. Wrong! And what have I learned since then? One shouldn't make color decisions under the influence of a cold.
I was desperate to do something fun, in spite of having to blow my nose every ten seconds. I had background patches already cut for the rest of my batik and hand-dye sawtooth stars so I figured it would be simple enough to fill them in. It was fun while I was making them but the next day there were a couple that sort of stuck out in a bad way.
Can you pick out the ones I have issues with?
This is the worst offender:
It may not be obvious in the picture but the star points are too much brighter than the center for my taste. Fortunately I have enough of the brown batik leftover to make a few more blocks if I want to. Don't you think the new blue and purple star looks better?
Now the question is whether I can live with the one in the lower right corner. I think I can, but I'll wait to see how it looks with the other blocks...
Being (mostly) an account of the creative endeavors of an artist and collector whose wings have been clipped by hypersensitivity to the chemicals in our everyday environment.
Wednesday, October 21, 2015
Saturday, October 17, 2015
Dark Stars
I've been making 8" Sawtooth stars again. These particular stars were not part of my original Rainbow Scrap Challenge plans but cropped up when I won a lovely set of hand dyes from Vicki Welsh in one of the RSC drawings. The blues and aquas in the set prompted me to get out my other precious hand dyed fabrics and pair them up with batiks. I started by making this set of stars:
I believe I have more than just these by now. This seems to be the only picture I have of them however, and I'm sorry it's not a better one.
When I'd used up the light batik I was using for the backgrounds of these stars I had to figure out what to do next. There weren't enough blocks for a decent size quilt. Nor did I want to just slap a wide border around the stars. So I looked through my stash and came up with a lush brown batik. I've always liked the combination of rusty browns and blues.
But it's gorgeous with other colors too!
These are the stars I've made so far with 16 Patch centers. There's another set of stars on brown backgrounds that have whole cloth centers. My intention is to surround the light background blocks with these dark stars, thus creating that wide border I needed to bring the top up to size.
I need 14 of these stars altogether, so only a few more to go. That should see me through the month of October and the Rainbow Scrap Challenge! I'm linking up with the other participants over at SoScrappy today. Go have a look and see what everyone else is doing; you won't be disappointed. :- )
I believe I have more than just these by now. This seems to be the only picture I have of them however, and I'm sorry it's not a better one.
When I'd used up the light batik I was using for the backgrounds of these stars I had to figure out what to do next. There weren't enough blocks for a decent size quilt. Nor did I want to just slap a wide border around the stars. So I looked through my stash and came up with a lush brown batik. I've always liked the combination of rusty browns and blues.
But it's gorgeous with other colors too!
These are the stars I've made so far with 16 Patch centers. There's another set of stars on brown backgrounds that have whole cloth centers. My intention is to surround the light background blocks with these dark stars, thus creating that wide border I needed to bring the top up to size.
I need 14 of these stars altogether, so only a few more to go. That should see me through the month of October and the Rainbow Scrap Challenge! I'm linking up with the other participants over at SoScrappy today. Go have a look and see what everyone else is doing; you won't be disappointed. :- )
Thursday, October 15, 2015
ScrapHappy October and a Tutorial
I'm linking up with Kate and Gun today to share one way I use up scraps here in The Magpie's Nest. I'm even going to attempt a tutorial!
When I was planning to create a border of Bow Tie blocks around my latest Parts Department quilt I discovered that I didn't have quite enough to get all the way around. It didn't take long to make another dozen.
Let me show you how I do it. :- )
Six inch Bow Ties are a great way to use up 3.5" and 2" patches. You need two 3.5" squares of two different prints, and two 2" squares of whichever print you want to be the Bow Tie (as opposed to the background). For the purpose of this tutorial I'll use white for the background and a black print for the Bow Tie and its' knot. We'll be piecing one part of the knot of the bow tie onto the two background squares.
Lay the little square right side down on top of the larger square, placing it right up into the corner and aligning two raw edges. Then you'll want a smallish acrylic ruler marked in quarter-inches. Lay your ruler on top of the two patches with the quarter-inch line running through the two opposing corners of the little square.
I have an overhead light making a reflection on the ruler. Here's a close-up:
See how the quarter-inch line is running right through the corner of the patch? This process eliminates the need to draw a line down the middle of the little square. Even if the two patches shift on their way to the sewing machine it's easy enough to line them back up again.
Once you have your ruler placed accurately use your rotary cutter to cut off the little triangle not covered by the ruler.
In this case I throw those little triangles away. When I'm making 3" x 6" flying geese I keep the off-cut triangles and sew them together to make my scrappy Broken Dishes or Pinwheel blocks.
Sew your altered patches together with a quarter-inch seam allowance. Repeat the process with the other little square and background patch.
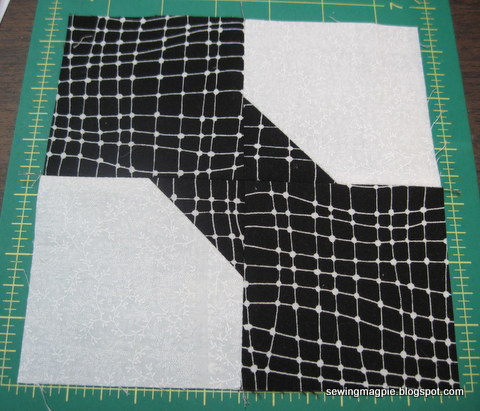
The next step is to pair these units up with the remaining 3.5" patches to create your bow tie. Here's what the back of my block looks like before I sew the final seam:
And here's the completed block:
I like to use these blocks between seams (as leaders and enders) when I'm working on other projects. The seams are all short and the block is simple to assemble. Now to decide whether to make a scrappy Bow Tie quilt out of these blocks or to hang onto them to use as a border in the future!
When I was planning to create a border of Bow Tie blocks around my latest Parts Department quilt I discovered that I didn't have quite enough to get all the way around. It didn't take long to make another dozen.
Let me show you how I do it. :- )
Six inch Bow Ties are a great way to use up 3.5" and 2" patches. You need two 3.5" squares of two different prints, and two 2" squares of whichever print you want to be the Bow Tie (as opposed to the background). For the purpose of this tutorial I'll use white for the background and a black print for the Bow Tie and its' knot. We'll be piecing one part of the knot of the bow tie onto the two background squares.
Lay the little square right side down on top of the larger square, placing it right up into the corner and aligning two raw edges. Then you'll want a smallish acrylic ruler marked in quarter-inches. Lay your ruler on top of the two patches with the quarter-inch line running through the two opposing corners of the little square.
I have an overhead light making a reflection on the ruler. Here's a close-up:
See how the quarter-inch line is running right through the corner of the patch? This process eliminates the need to draw a line down the middle of the little square. Even if the two patches shift on their way to the sewing machine it's easy enough to line them back up again.
Once you have your ruler placed accurately use your rotary cutter to cut off the little triangle not covered by the ruler.
In this case I throw those little triangles away. When I'm making 3" x 6" flying geese I keep the off-cut triangles and sew them together to make my scrappy Broken Dishes or Pinwheel blocks.
Sew your altered patches together with a quarter-inch seam allowance. Repeat the process with the other little square and background patch.
The next step is to pair these units up with the remaining 3.5" patches to create your bow tie. Here's what the back of my block looks like before I sew the final seam:
And here's the completed block:
I like to use these blocks between seams (as leaders and enders) when I'm working on other projects. The seams are all short and the block is simple to assemble. Now to decide whether to make a scrappy Bow Tie quilt out of these blocks or to hang onto them to use as a border in the future!
Thursday, October 8, 2015
Super Scrappy October
Brown is the color for October in the Rainbow Scrap Challenge. I've made a couple of blocks...
But more of my time has been spent working on the Parts Department quilt top. If you recall, I had it up to 72" square at this point:
My goal was 84" square so I needed twelve inches overall to get there. My first idea was to use 6" Bow Tie blocks all the way around to create a final border.
I was hoping for a ribbon-like effect all the way around.
The Bow Ties would have aligned beautifully at the corners, creating a continuous string. However, it only took two border strips to make me realize how distracting those Bow Ties were going to be. I had to let this sit on the back burner for a few days before a better idea presented itself.
First of all, I knew I wanted another strip of a single fabric to frame the 9" Shoo-fly borders. Had to find the right color/print for that, and something I had enough of to go all the way around the flimsy. That left four inches to fill somehow. I don't have a lot of parts that small in my Parts Department and I really didn't want to take the time to make the number I'd need to cover that distance!
Then I thought about the central section of the top, specifically the "Lego" blocks I used around the Ohio Star. Could I do something like that to make the four inches of borders I needed? Certainly! Scrap strips, 2.5" wide, sewn end-to-end until I had 145" in length, then folded over one time and sewn down the length created a four inch wide (4.5" raw), 72" long unit. Four of those were all I needed.
To turn the corners I made four chevron type Log Cabin blocks. I began with squares of the same red print that I'd used for the framing strips. That links up the four single red strips into one contiguous frame.
I like this much better. I've nearly used up my scrap 2.5" strips, made a healthy dent in the 2" scrap strips, and reduced the inventory in my Parts Department. :D When I put this on my double bed I was delighted to see how well suited it is. The blue frame comes right out to the edges of the mattress, thus allowing the Shoo-fly blocks and outer border to be seen as the drop on each side and along the foot of the bed. It could be longer of course, but this is as big as this one is going to be. Who makes up a bed formally anymore anyway? I don't! (Never could master a pillow tuck to my satisfaction. I'd spend all day fussing with it!)
I'll be linking up with the other rainbow scrappers on Saturday. Meanwhile, my F2F swap blocks have been arriving over the last couple of weeks. So much squishy goodness in the mailbox! They're going to make another rainbow quilt, this time one for my own bed. :- )
| (red background but the star is a tan print) |
But more of my time has been spent working on the Parts Department quilt top. If you recall, I had it up to 72" square at this point:
My goal was 84" square so I needed twelve inches overall to get there. My first idea was to use 6" Bow Tie blocks all the way around to create a final border.
| the bottom row |
| the top of the flimsy |
First of all, I knew I wanted another strip of a single fabric to frame the 9" Shoo-fly borders. Had to find the right color/print for that, and something I had enough of to go all the way around the flimsy. That left four inches to fill somehow. I don't have a lot of parts that small in my Parts Department and I really didn't want to take the time to make the number I'd need to cover that distance!
Then I thought about the central section of the top, specifically the "Lego" blocks I used around the Ohio Star. Could I do something like that to make the four inches of borders I needed? Certainly! Scrap strips, 2.5" wide, sewn end-to-end until I had 145" in length, then folded over one time and sewn down the length created a four inch wide (4.5" raw), 72" long unit. Four of those were all I needed.
To turn the corners I made four chevron type Log Cabin blocks. I began with squares of the same red print that I'd used for the framing strips. That links up the four single red strips into one contiguous frame.
I like this much better. I've nearly used up my scrap 2.5" strips, made a healthy dent in the 2" scrap strips, and reduced the inventory in my Parts Department. :D When I put this on my double bed I was delighted to see how well suited it is. The blue frame comes right out to the edges of the mattress, thus allowing the Shoo-fly blocks and outer border to be seen as the drop on each side and along the foot of the bed. It could be longer of course, but this is as big as this one is going to be. Who makes up a bed formally anymore anyway? I don't! (Never could master a pillow tuck to my satisfaction. I'd spend all day fussing with it!)
I'll be linking up with the other rainbow scrappers on Saturday. Meanwhile, my F2F swap blocks have been arriving over the last couple of weeks. So much squishy goodness in the mailbox! They're going to make another rainbow quilt, this time one for my own bed. :- )
Sunday, September 27, 2015
Last Scraps of September
There's been a lot of effort in The Magpie's Nest this week but very little of it has been in the Rainbow Scrap Challenge color of the month, orange. I did manage to make up these four blocks:
But more time was spent auditioning blocks for another round on the Parts Department medallion top I've been building. You can see its' inception in this blog post. This is what I had on the design wall when last you saw it:
This is what it looked like earlier this week:
It's 72" square at this point, and technically too big for my design wall anymore. I am determined to make it big enough to use on a double bed however, so it has to get a bit bigger. I have already auditioned and applied six inch Bow Tie blocks to two sides. That was several days ago. Looking at this picture now is making me question whether that was the best choice. I had my doubts at the time but plowed ahead, anxious to get as close to done as possible. Perhaps I need to reconsider my options. Or try to get a photo of the top with the two new borders and see what my reaction is. Or I could just continue on and add the remaining two sides of Bow Tie blocks and see what I think then. I'm not super-glueing the blocks in place after all. If I don't like it I can always take them off again. I'm not afraid to use the seam ripper when necessary!
I'm joining in with the linky party over at SoScrappy (late, as usual).
| one 12" Ohio Star and two 10" Wrenches |
But more time was spent auditioning blocks for another round on the Parts Department medallion top I've been building. You can see its' inception in this blog post. This is what I had on the design wall when last you saw it:
This is what it looked like earlier this week:
| (those are 9" Shoo-fly and Ohio Star blocks around the perimeter) |
It's 72" square at this point, and technically too big for my design wall anymore. I am determined to make it big enough to use on a double bed however, so it has to get a bit bigger. I have already auditioned and applied six inch Bow Tie blocks to two sides. That was several days ago. Looking at this picture now is making me question whether that was the best choice. I had my doubts at the time but plowed ahead, anxious to get as close to done as possible. Perhaps I need to reconsider my options. Or try to get a photo of the top with the two new borders and see what my reaction is. Or I could just continue on and add the remaining two sides of Bow Tie blocks and see what I think then. I'm not super-glueing the blocks in place after all. If I don't like it I can always take them off again. I'm not afraid to use the seam ripper when necessary!
I'm joining in with the linky party over at SoScrappy (late, as usual).
Subscribe to:
Posts (Atom)